



How to Make Stickers With Cricut: Step-by-Step Guide
 Published
 Updated

How to make stickers with Cricut comes down to Print Then Cut. You print the design on sticker paper with a home inkjet printer, then let the machine read the printed registration box and cut around each shape. Design Space handles layout, the printer handles color, and the blade only traces what is already on the page.
The part that confuses most people the first week is that the machine never prints anything. A Cricut is a cutter, not a printer. Print Then Cut is a two device job: your inkjet lays down the ink, and the Cricut reads a black rectangle printed around the sheet so it knows exactly where the artwork sits on the mat. Once that idea clicks, sticker making stops feeling like a special skill and starts feeling like careful setup.
This walkthrough of how to make stickers with Cricut assumes you have already cut something simple in vinyl or cardstock. If you have not, the Design Space beginner guide covers the canvas, the layers panel and the Make It screen, which are the three places you will spend all of your time here.
What You Need Before the First Sheet
The shopping list is short, but two items on it are non negotiable and both of them catch beginners.
The first is an inkjet printer. Cricut printable sticker paper and printable vinyl are coated for inkjet ink only, and running them through a laser printer can melt the coating onto the fuser. Cricut states this plainly on the printable sticker paper help page. If your only printer is a laser, you are not out of the game, but you will be cutting pre colored vinyl instead of printing, which is covered further down.
The second is a machine that supports Print Then Cut. Every Explore and Maker model does. The original Cricut Joy does not, because it has no sensor to read the registration marks, though the Joy Xtra does. If you are working on a Joy and wondering why the option never appears, that is the reason rather than a settings problem.
Beyond that: sticker paper or printable vinyl, a StandardGrip mat in good condition, and artwork. Artwork for stickers is nearly always PNG files with a transparent background rather than SVG, because Print Then Cut needs full color pixels to print and a clean edge to trace. An SVG will work if it is already colored, but a flattened PNG behaves more predictably.
💡 Pro Tip
Buy two packs of sticker paper the first time, and treat the first pack as consumable. Calibration, color tests and one badly weeded sheet will eat four or five pages before anything looks sellable. Crafters who price their first sticker sheets usually forget to count those pages, and the margin disappears.
How Do You Make Stickers With Cricut Step by Step?
The full sequence for how to make stickers with Cricut is upload, size, flatten, print, load, cut. Six steps, and only two of them are easy to get wrong.
1. Upload and size the artwork
Upload your PNG through the Upload panel and choose Complex if the image has soft edges or shading. Design Space will offer to remove the background; for a PNG that already has transparency, accept it without erasing anything. Drop the image on the canvas and set the real world size now rather than later. A 2 inch sticker and a 3 inch sticker cut identically, but the 3 inch version needs a thicker white border to survive being peeled.
2. Add the cut line with Create Sticker or Offset
Design Space has a dedicated Create Sticker tool that adds a white border and a cut path in one move. If you prefer manual control, select the image, apply Offset at roughly 0.08 to 0.12 inches, then select both layers and use Attach so the border and the image travel together. Getting Attach right is the same skill as grouping and ungrouping layers, and the two operations are constantly confused.
3. Flatten
Flatten is what turns a normal cut job into a print job. Select every layer that should be printed as one image and press Flatten in the bottom right panel. If you skip this, the machine will try to cut every internal line in the artwork, and you will get a shredded sheet instead of a sticker.
4. Print, load, cut
On the Make It screen, choose Send to Printer, turn off Use System Dialog unless you need a specific tray, and set your printer to its highest quality setting. Cricut recommends the highest setting for crisp, evenly covered prints, and the side benefit is a denser black registration box for the sensor to find. Load the printed sheet in the top left corner of the mat, set material to Printable Sticker Paper, and let it run.
⚠️ Common Mistake to Avoid
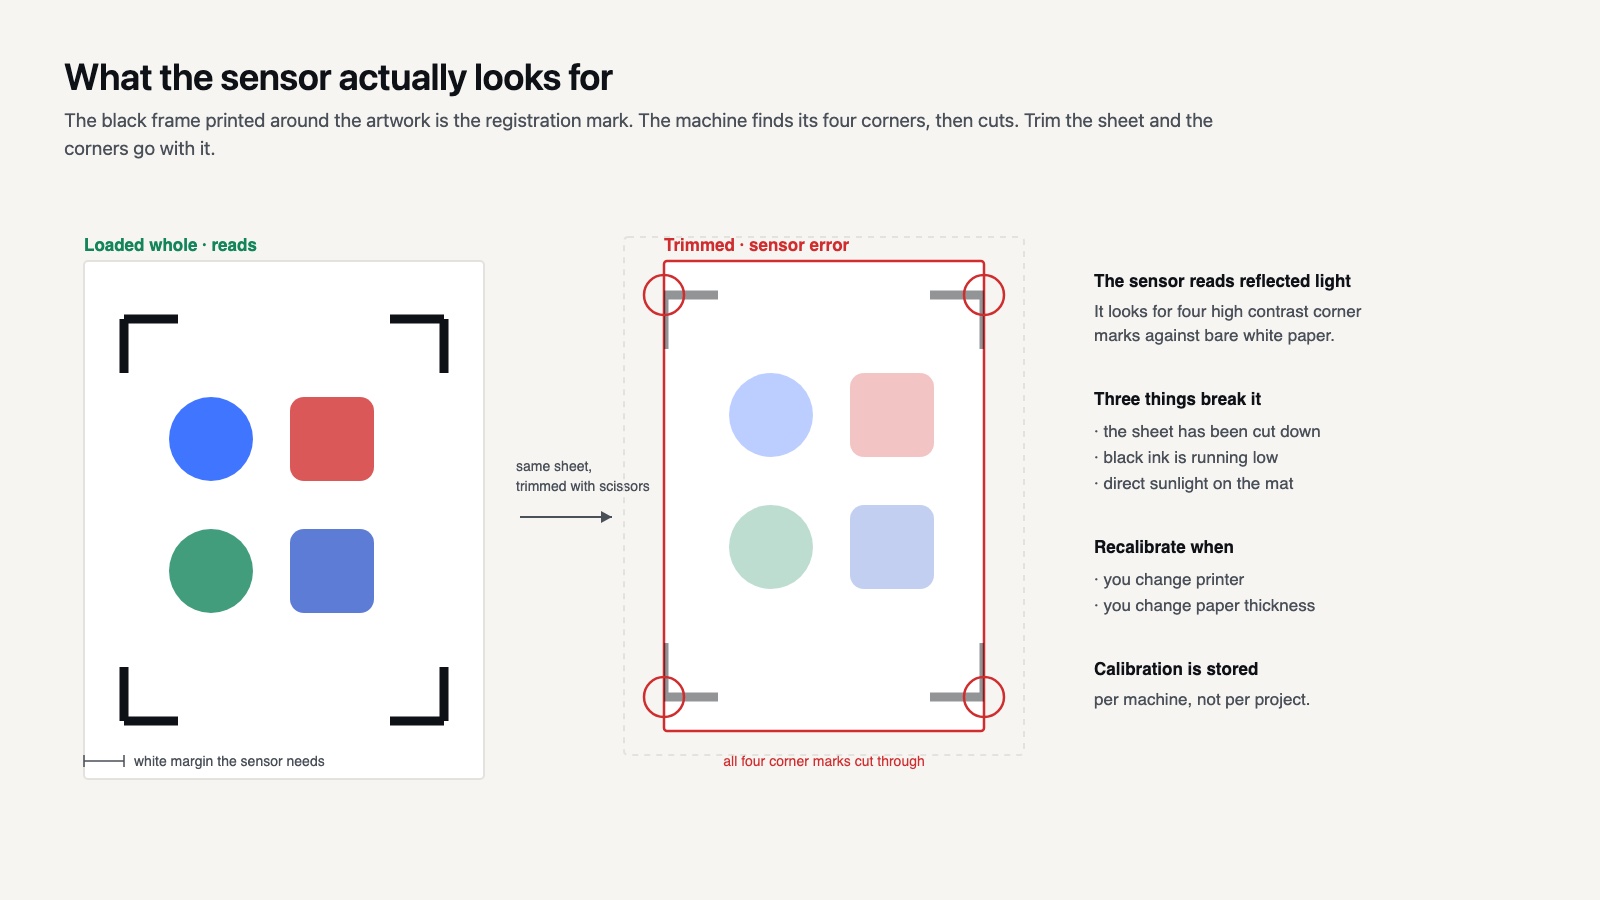
Trimming the printed sheet before you cut it. The black rectangle around the artwork is the registration mark, and the sensor needs the full white margin around it to find the corners. Cut the sheet down and the machine will stall with a sensor error. Load the page whole, every time.
Kiss Cut or Die Cut: Which Do You Actually Want?
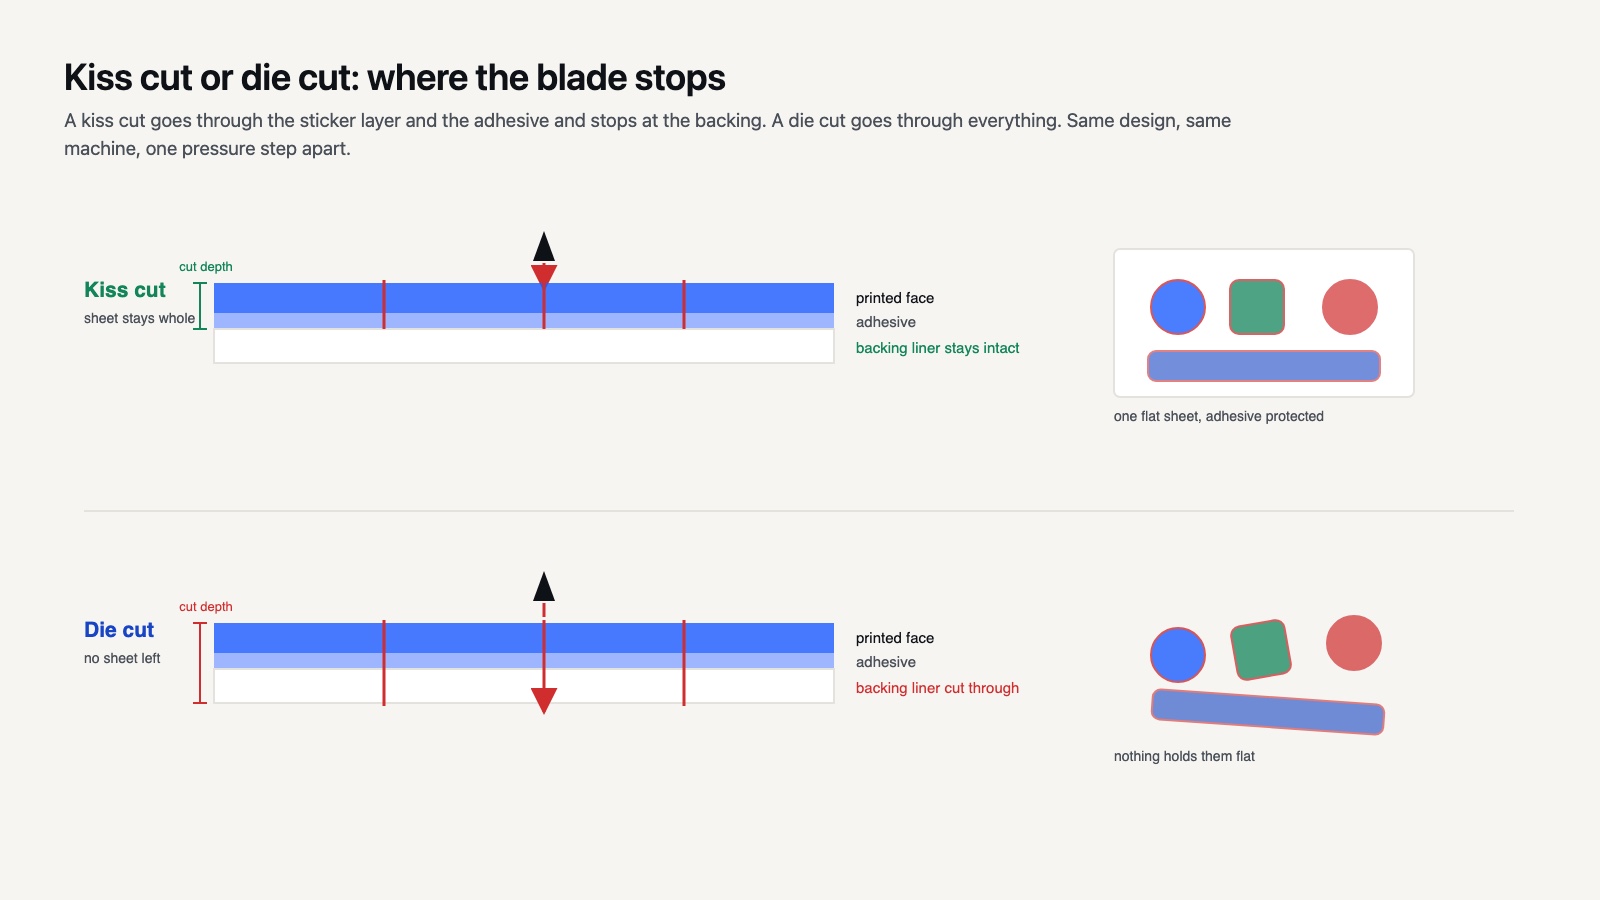
A kiss cut goes through the sticker layer and stops at the backing paper, so the sheet stays in one piece and each sticker peels off. A die cut goes through everything, so you end up with loose individual stickers.
For sheets you sell or hand out, kiss cut is almost always right: the backing keeps the stickers flat, protects the adhesive and makes the product look finished. Die cut suits planner stickers that go straight into a bag, or single large decals. Design Space exposes this as a material pressure choice rather than a labeled option, so on printable vinyl you select the kiss cut material setting, and on sticker paper you use the standard setting with pressure reduced one step.
The honest limitation is that home machines are not as consistent at kiss cutting as commercial sticker printers. Expect to test pressure on one sheet, note the setting, and reuse it. The same trial and error logic applies to cutting and applying adhesive vinyl, where a test strip saves a whole roll.
Print Then Cut Size Limits and Calibration
The old ceiling for a Print Then Cut image was 6.75 by 9.25 inches, which is why so many older tutorials quote that number. Design Space has since raised it, and on a US Letter sheet you can now work with roughly 7.55 by 9.94 inches of usable area, with larger sizes available on tabloid paper if your printer takes it. That is about a fifth more usable area, which on most layouts is one extra row of small stickers per sheet and matters if you price by the page.
Calibration is the other number that decides whether your stickers look professional. Cricut’s Print Then Cut calibration routine prints a grid, cuts it, and asks you which line the blade landed on. It takes four minutes and it is the single highest value thing you can do before your first real sheet.
📐 Technical Note
Recalibrate whenever you change printer, and whenever you change paper thickness by a noticeable amount. The sensor reads reflected light off the registration box, so a glossy sticker sheet and a matte one can register differently on the same machine. Calibration is stored per machine, not per project.

Can You Make Stickers Without a Printer?
Yes, and this route is underrated. Instead of printing color, you cut solid colored adhesive vinyl and layer it. The result is a vinyl decal rather than a paper sticker: fewer colors, much better outdoor life, and no Print Then Cut involved at all.
Layered vinyl decals suit logos, lettering and simple shapes. Anything with a gradient or a photograph will not translate. If you already cut vinyl for shirts or mugs, you have the whole skill set, and the workflow is closer to making labels with a Cricut Joy than to sticker printing. This is also the only sticker route available on the original Joy.
Making Stickers Last: Sealing and Material Choice
Paper sticker paper is indoor only. Water will wrinkle it and sunlight will fade the ink within weeks. Three options get you past that.
Printable vinyl is the usual upgrade, and it survives a water bottle. Adding a laminate sheet on top of printable vinyl gets you closer to commercial durability and stops the ink lifting when the sticker is rubbed. And for genuinely outdoor use, purpose made waterproof printable material from a label manufacturer such as Avery’s waterproof printable vinyl is rated for exposure that craft sticker paper never claims.
Sealing matters more than most beginners expect, because the failure is delayed. A sticker that looks perfect on the day will start lifting at the edges after two weeks on a laptop, and by then the customer has already received it.
💡 Pro Tip
Let printed sheets dry for ten minutes before they touch the mat. Fresh inkjet ink transfers onto a StandardGrip mat surprisingly easily, and once a mat has picked up pigment it will mark the back of every sheet you load after it. A drying rack is a stack of books and some patience.
Working From a Phone or Tablet
Print Then Cut works in the Design Space mobile app, with one wrinkle: the app prints through your device’s own print system, so your printer has to be reachable over AirPrint or the equivalent. iOS handles this well, Android is less predictable depending on printer brand.
Everything else behaves the same as desktop, including Flatten and calibration. If you mostly work on a tablet, the mobile Cricut workflow guide covers the connection and app differences in more detail than the sticker specific steps need here.
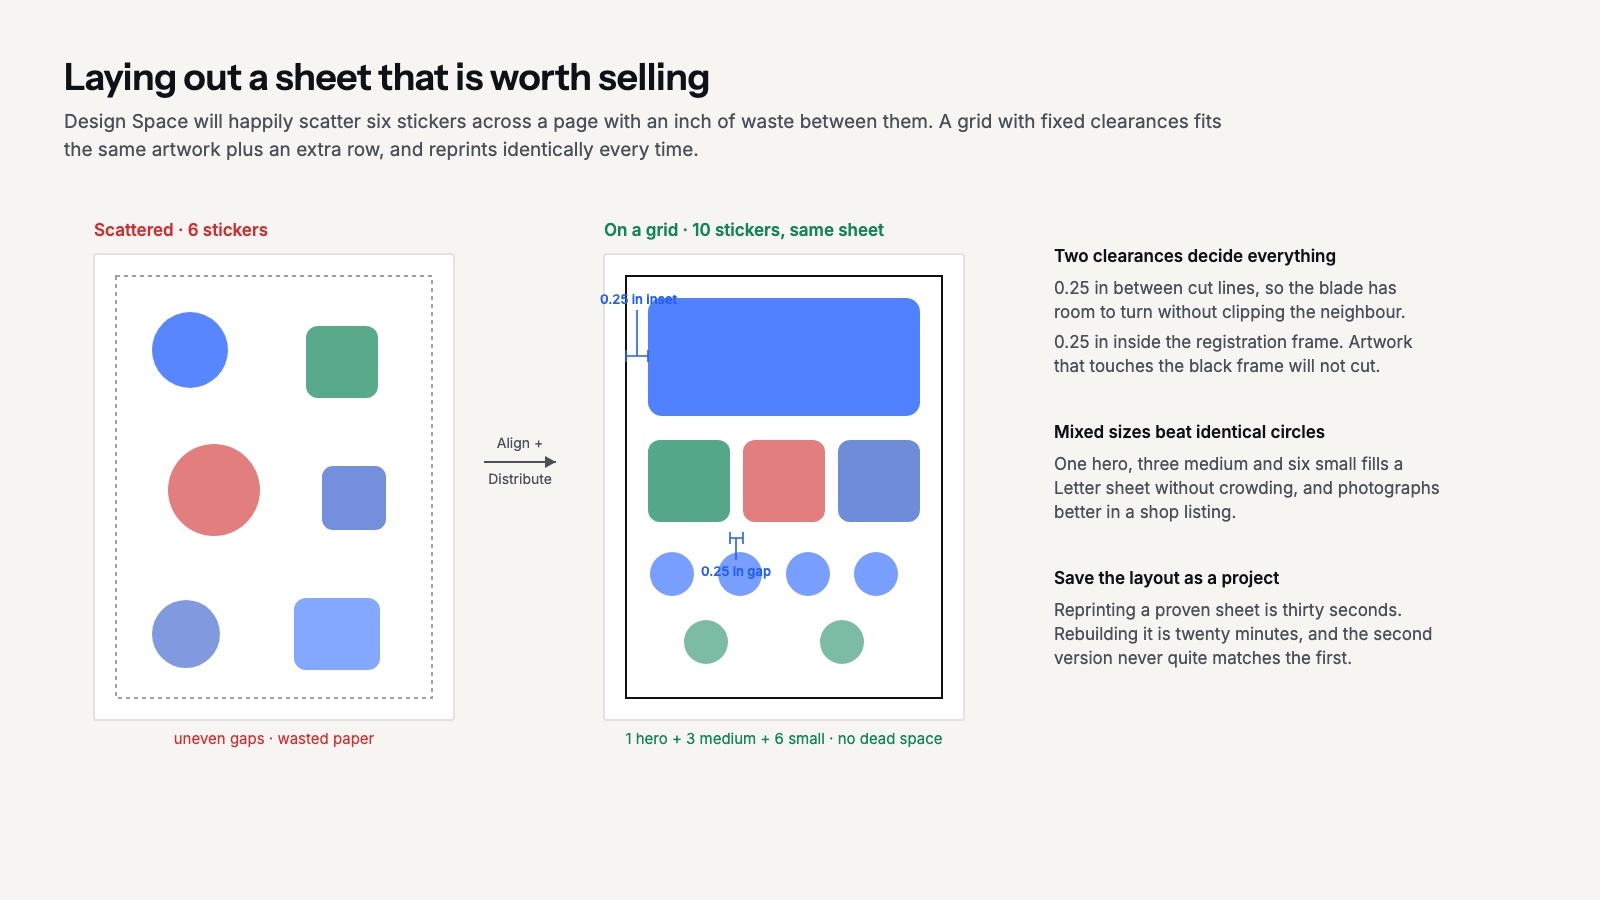
Laying Out a Sheet Worth Selling
Once you know how to make stickers with Cricut mechanically, the difference between a hobby sheet and a sellable one is layout. Design Space will happily print six stickers scattered across a page with an inch of waste between them, and that waste is money.
Work to a grid. Set your smallest sticker size first, then use Align and Distribute Horizontally to space a row evenly, duplicate the row and nudge it down. Keep at least 0.25 inches between cut lines so the blade has room to turn, and keep everything at least 0.25 inches inside the registration box. Designs that touch the black frame will not cut.
Mixed sizes on one sheet are fine and usually look better in a shop listing than a page of identical circles. A common arrangement is one large hero sticker, three medium and six small, which fills a Letter sheet without crowding. If you are short on artwork to fill the grid, a free bundle is a low risk way to test layout and print settings before you commit paid files to a production run.
Save the finished layout as a project. Reprinting a proven sheet is thirty seconds of work; rebuilding it from scratch is twenty minutes, and the second version never quite matches the first.
Where to Go From Here
Your Next Step: Run the Print Then Cut calibration before you design anything, then print one test sheet of four small stickers at different sizes and peel them the next day. Those two steps will tell you more about your particular printer and paper combination than any amount of reading, and they cost one page.
Frequently Asked Questions
Why is my Cricut not reading the registration marks?
Most often the sheet has been trimmed, the mat is loaded crooked, or the room light is hitting the sensor. Load the full untrimmed page square in the top left corner and try again with normal indoor light rather than direct sun. A printer running low on black ink also produces a registration box too faint to read.
What size should sticker files be?
Design at the size you intend to cut, at 300 dpi or higher. A 2 inch sticker needs roughly a 600 pixel image; anything smaller will print soft. Scaling a small PNG up in Design Space does not add detail, it only enlarges the existing pixels.
Can I sell stickers I make on a Cricut?
You can sell stickers you make, provided you hold the rights to the artwork. Files bought from a cut file shop carry their own license terms, and character, film and brand artwork stays protected by copyright and trademark whatever file you bought it in. Personal use and commercial sale are different permissions, and checking the license before you list is your responsibility as the seller.
Is printable vinyl better than sticker paper?
For anything that will get wet or handled, yes. Printable vinyl costs more per sheet and cuts slightly differently, but it does not wrinkle and it holds ink better under a laminate. Sticker paper remains the cheaper choice for planner stickers, packaging and classroom use where water is not a factor.