




Upload SVG to Cricut Design Space: Step-by-Step
 Published
Updated
To upload SVG to Cricut Design Space, open a project, click Upload in the left panel, choose Upload Image, select your SVG file, then click Insert Images. The file lands on your canvas as an editable, scalable cut file ready to size, ungroup, and send to your machine.
SVG cut files are the fastest way to make professional Cricut projects without designing from scratch. If you have ever bought a digital download and stared at the zip folder wondering what to do next, you are in the right place. This guide walks through how to upload SVG to Cricut Design Space on both desktop and mobile, explains why the process sometimes fails, and shows how to keep your layers and colors intact. If the file will not even open on your computer, start with opening an SVG instead.
What is an SVG file and why Cricut loves it
SVG stands for Scalable Vector Graphics. Unlike a JPG or PNG made of pixels, a vector file is built from mathematical paths, so it stays razor sharp at any size. You can scale a tiny logo up to a wall decal and the edges never blur or pixelate. You can read more about the format on Wikipedia’s SVG page.
Cricut machines read these clean paths as cut lines, which is exactly why crafters prefer SVGs over flat images. When you upload an SVG to Cricut Design Space, the software automatically separates colors into layers, so a multi-color design arrives ready to cut on different vinyl or cardstock sheets.
Before you start: unzip your download
Most SVG cut files arrive as a compressed zip folder. Cricut Design Space cannot read a zip directly, so you have to extract the files first.
- Windows: Right-click the zip folder, choose Extract All, then pick a location you will remember, like your Desktop or a Cricut folder.
- Mac: Double-click the zip and macOS extracts it into the same folder automatically.
- iPhone or iPad: Tap the zip in the Files app and it expands into a new folder you can browse.
Inside, look for the file ending in .svg. Many bundles also include PNG, DXF, EPS, and PDF versions. For Cricut, the SVG is the one you want, and the SVG versus PNG comparison explains what the rest are for. If you need quality files to practice with, browse the SVG DROP cut files collection.
⚠️ Common Mistake to Avoid
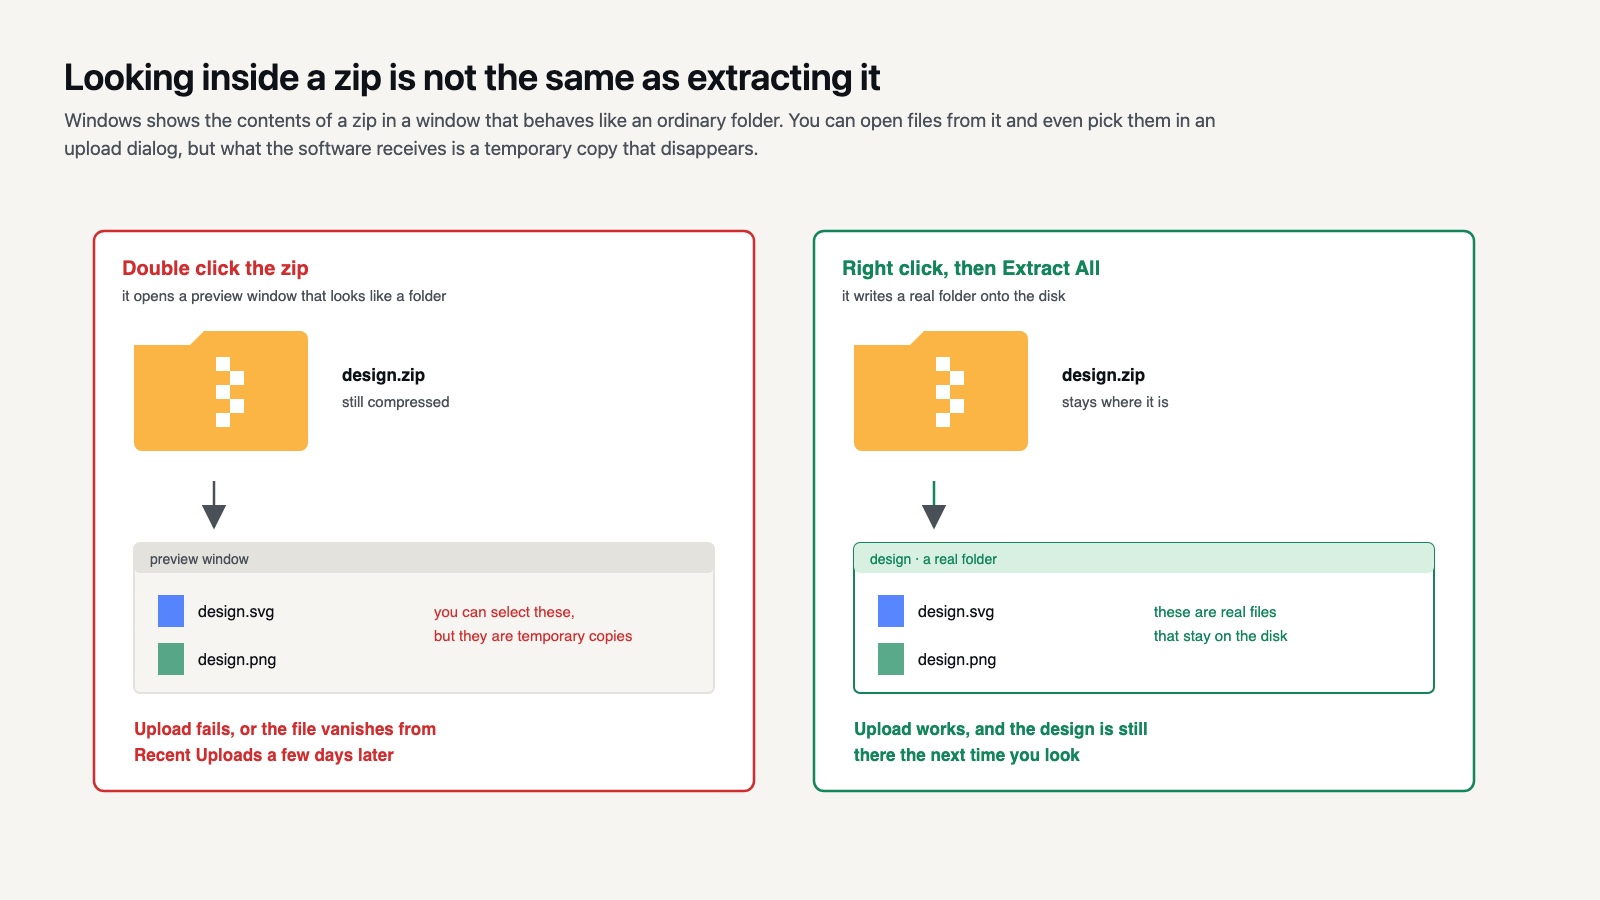
Extracting the zip is not the same as opening it. On Windows, double clicking a zip shows you the contents in a preview window that looks exactly like a normal folder, and you can drag a file out of it and even select it in a file dialog. Design Space will then read a temporary copy that disappears, and the upload either fails or the file vanishes from Recent Uploads later. Use Extract All and work from the real folder it creates.
How do I upload SVG to Cricut Design Space on desktop?
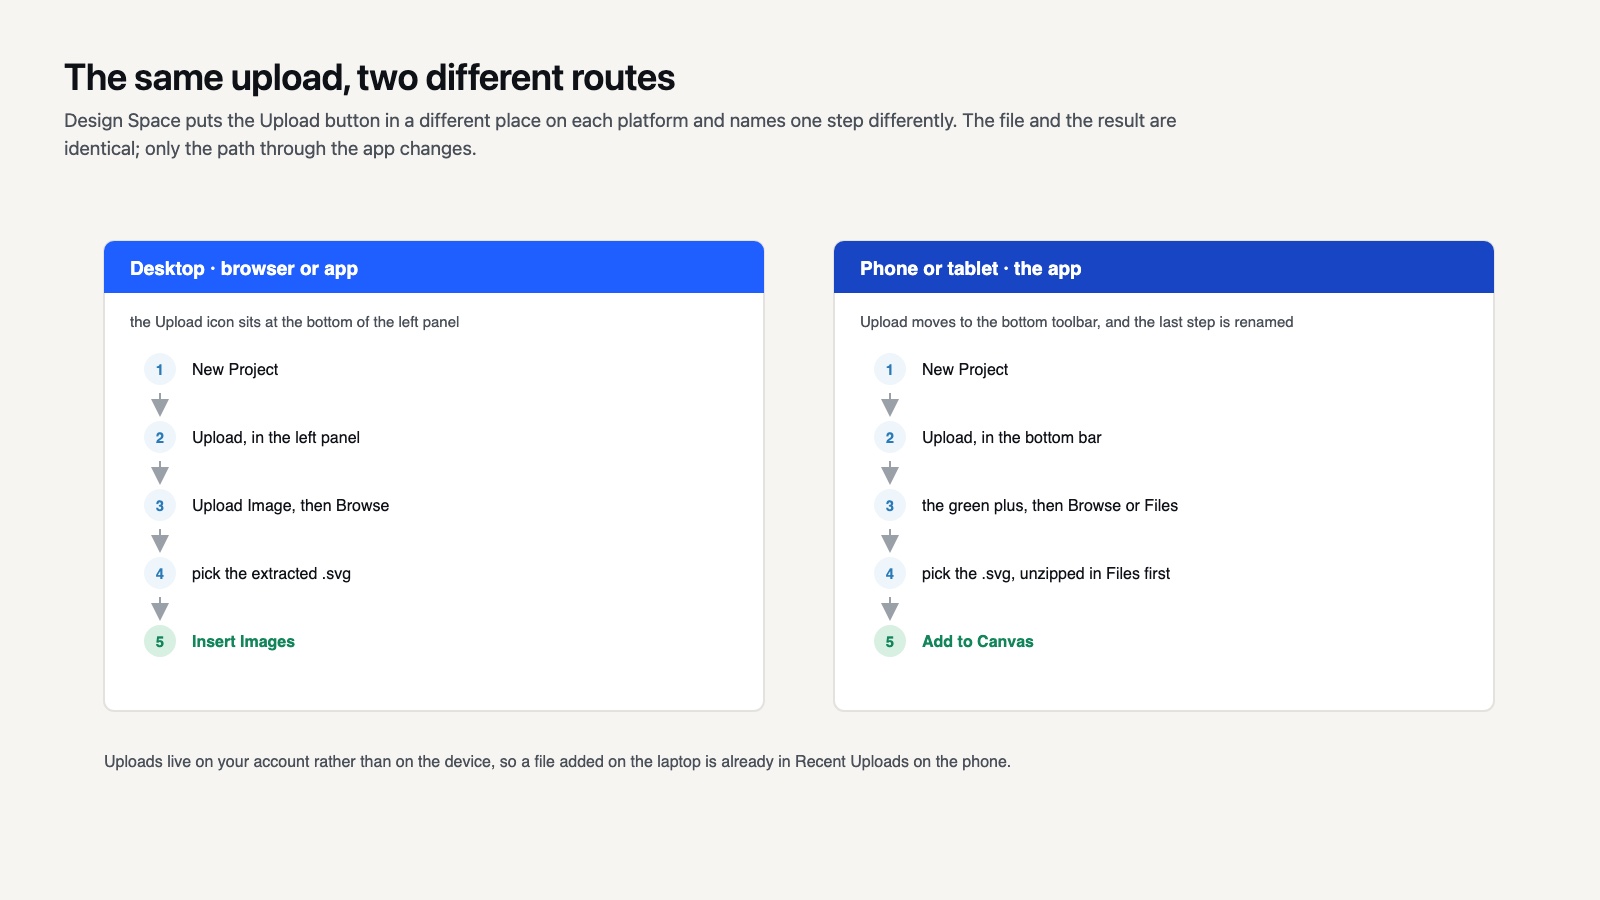
To upload an SVG on desktop, use the Upload button in the left toolbar, select your extracted SVG, and insert it onto the canvas. The full process takes under a minute once your file is unzipped. Open Design Space on your computer and follow these steps.
- Click New Project to open a blank canvas.
- In the left-hand panel, click the Upload icon (it sits near the bottom).
- Click Upload Image.
- Click Browse and locate the extracted
.svgfile, or drag and drop it into the window. - Add a name and tags if you want, then click Upload.
- Your file appears under Recent Uploads. Click it once to select it, then click Insert Images.
- The SVG drops onto your canvas as a grouped, layered design.
One detail trips up beginners: SVGs go through the same Upload button as photos, but you never crop or remove a background. The vector layers come through automatically, so skip any image-cleanup steps and head straight to Insert. A PNG is the opposite case and does need that cleanup, which is covered in the Print Then Cut walkthrough.
Comparison: SVG vs PNG upload
If your bundle includes both formats, here is what changes during upload.
| Step | SVG (cut file) | PNG (image) |
|---|---|---|
| Upload type | Upload Image, inserts directly | Upload Image, then choose complexity |
| Background removal | Not needed | Often required |
| Layers | Separated by color automatically | Single flattened layer |
| Scaling | Stays sharp at any size | Can blur when enlarged |
| Best for | Layered vinyl, cutting | Print Then Cut, stickers |
How to upload SVG to Cricut Design Space on mobile
The mobile app handles the same job with a slightly different layout. Make sure you have unzipped the file inside your phone’s Files app first.
- Open the Cricut Design Space app and tap New Project.
- Tap Upload in the bottom toolbar.
- Tap the green plus or Upload Image button.
- Choose Browse or Files, then locate the
.svg. - Confirm, then tap the uploaded file and select Add to Canvas.
On iPhone and iPad you can also save SVGs straight from email or a download link into the Files app, which makes them easy to find later. Android works the same way through your device’s file manager.
Editing your SVG after upload
Once the file is on your canvas, a few quick edits get it ready to cut.
Resize without breaking proportions
Click the design, then drag a corner handle to scale it. Because it is a vector, it stays crisp. Lock the aspect ratio (the padlock icon) so text and shapes do not stretch oddly.
Ungroup to edit single pieces
A layered SVG arrives as a group. Click Ungroup in the Layers panel to move, recolor, or delete individual parts. This is how you change a design’s colors to match your vinyl.
Use Attach to lock your layout
If you arranged several pieces exactly how you want them cut, select them and click Attach. This tells the machine to keep them in position on the mat instead of rearranging them to save material.
When the SVG lands at the wrong size
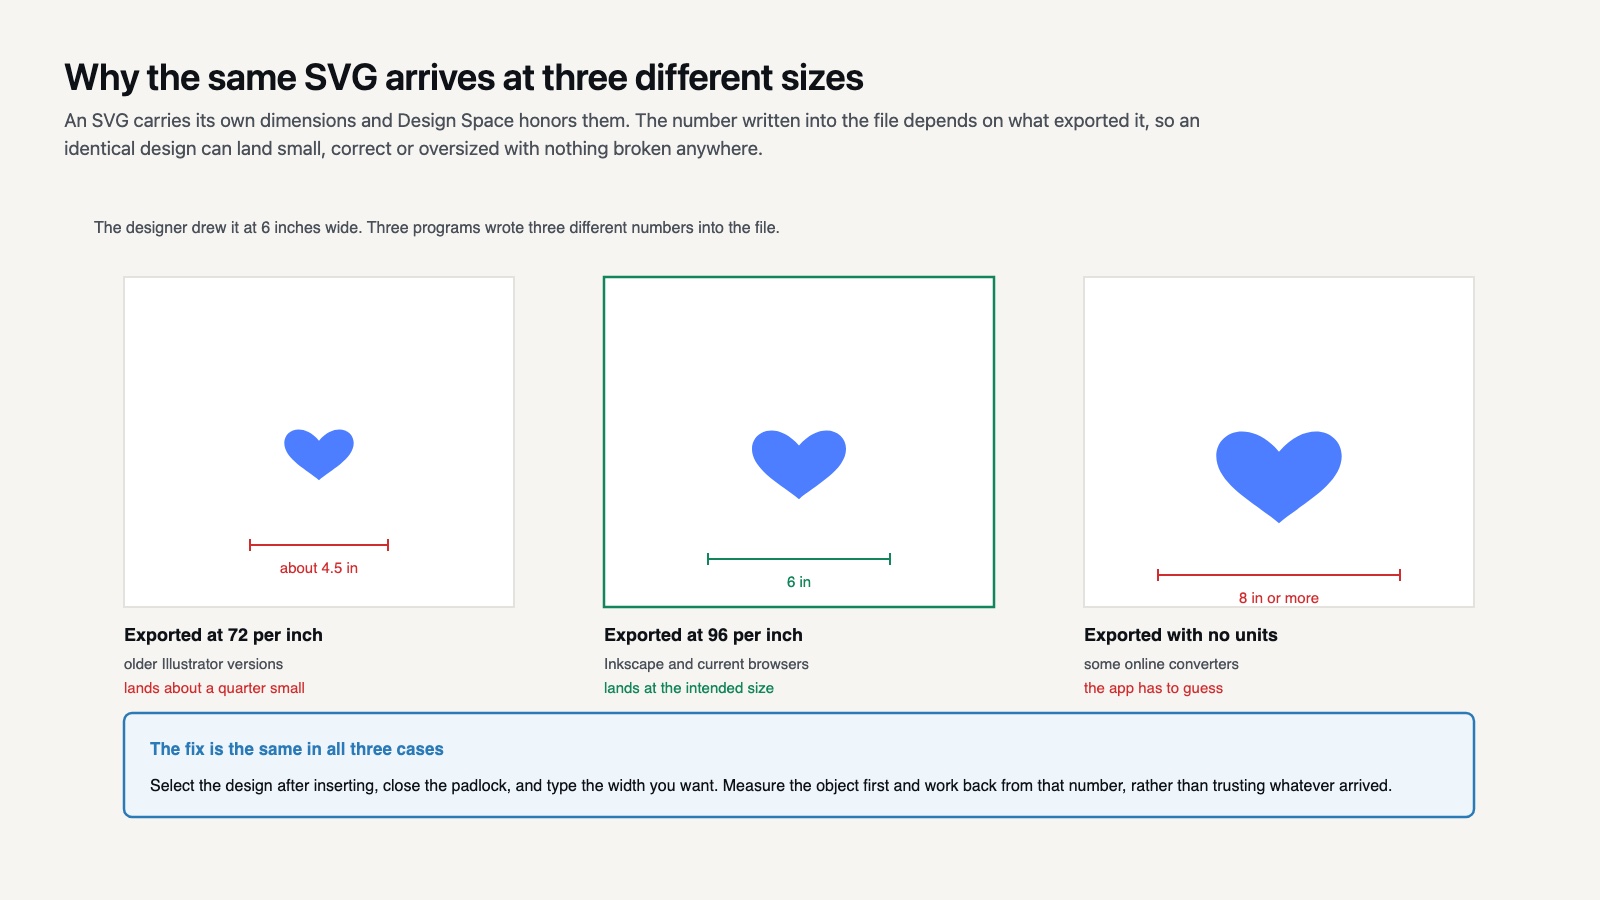
An SVG carries its own dimensions, and Design Space honors them rather than picking a size for you. That is why one download arrives at a sensible six inches wide and the next one lands as a two inch thumbnail or spills off the canvas entirely.
The usual cause is the program the file was exported from. Older versions of Adobe Illustrator wrote SVG dimensions at 72 pixels per inch, while Inkscape and current browsers work at 96. A file exported under the older assumption arrives about a third smaller than the designer intended, and one exported the other way arrives correspondingly larger. Nothing is broken in the file, and nothing you do at upload time changes it.
The fix is simply to set the size yourself after inserting. Select the design, then type the width you want into the size field at the top of the canvas with the padlock closed so the height follows. For a shirt design, measure the wearer’s chest width and work back from there rather than trusting whatever number the file arrived with. The resizing guide covers the limits worth knowing before you scale something far up or far down.
One thing to watch: if a design arrives very small and you enlarge it a great deal, any hairline detail in it grows too, which is usually good. Going the other way is where trouble starts. A design shrunk well below its intended size will have strokes narrower than the blade can reliably cut, and it will tear during weeding rather than fail outright at the machine.
Why won’t my SVG upload to Cricut Design Space?
If your SVG will not upload, the most common cause is trying to load it while it is still inside a zip folder, or the file being corrupted during download. Extracting the zip first solves the majority of cases. Work through these checks if you still hit a wall.
- Still zipped: Cricut cannot open a compressed folder. Extract it and select the standalone
.svg. - Wrong file picked: Make sure you chose the file ending in
.svg, not the EPS, DXF, or PDF version. - Incomplete download: Re-download the file. A partial download produces a broken SVG that fails silently.
- Browser glitch: Refresh the page, clear your cache, or switch browsers. Design Space runs best on current versions of Chrome, Safari, Edge, and Firefox.
- Free account limits: Uploading and cutting your own SVGs is free and does not need Cricut Access. If the editing tools look locked, check that you are signed in rather than assuming a paywall.
For persistent errors, Cricut publishes an unsupported items list that names the specific things an upload will reject.
📐 Technical Note
Design Space keeps every upload on your account, not on the computer you uploaded it from. Sign in on a laptop, a tablet and the phone app and the same Recent Uploads list appears on all three. That is genuinely useful, but the list has no folders and sorts newest first, so it turns into an unsearchable wall within a few months. Naming files at upload time, rather than accepting the filename, is the only organisation the system offers.
Why does my SVG cut as one solid shape?
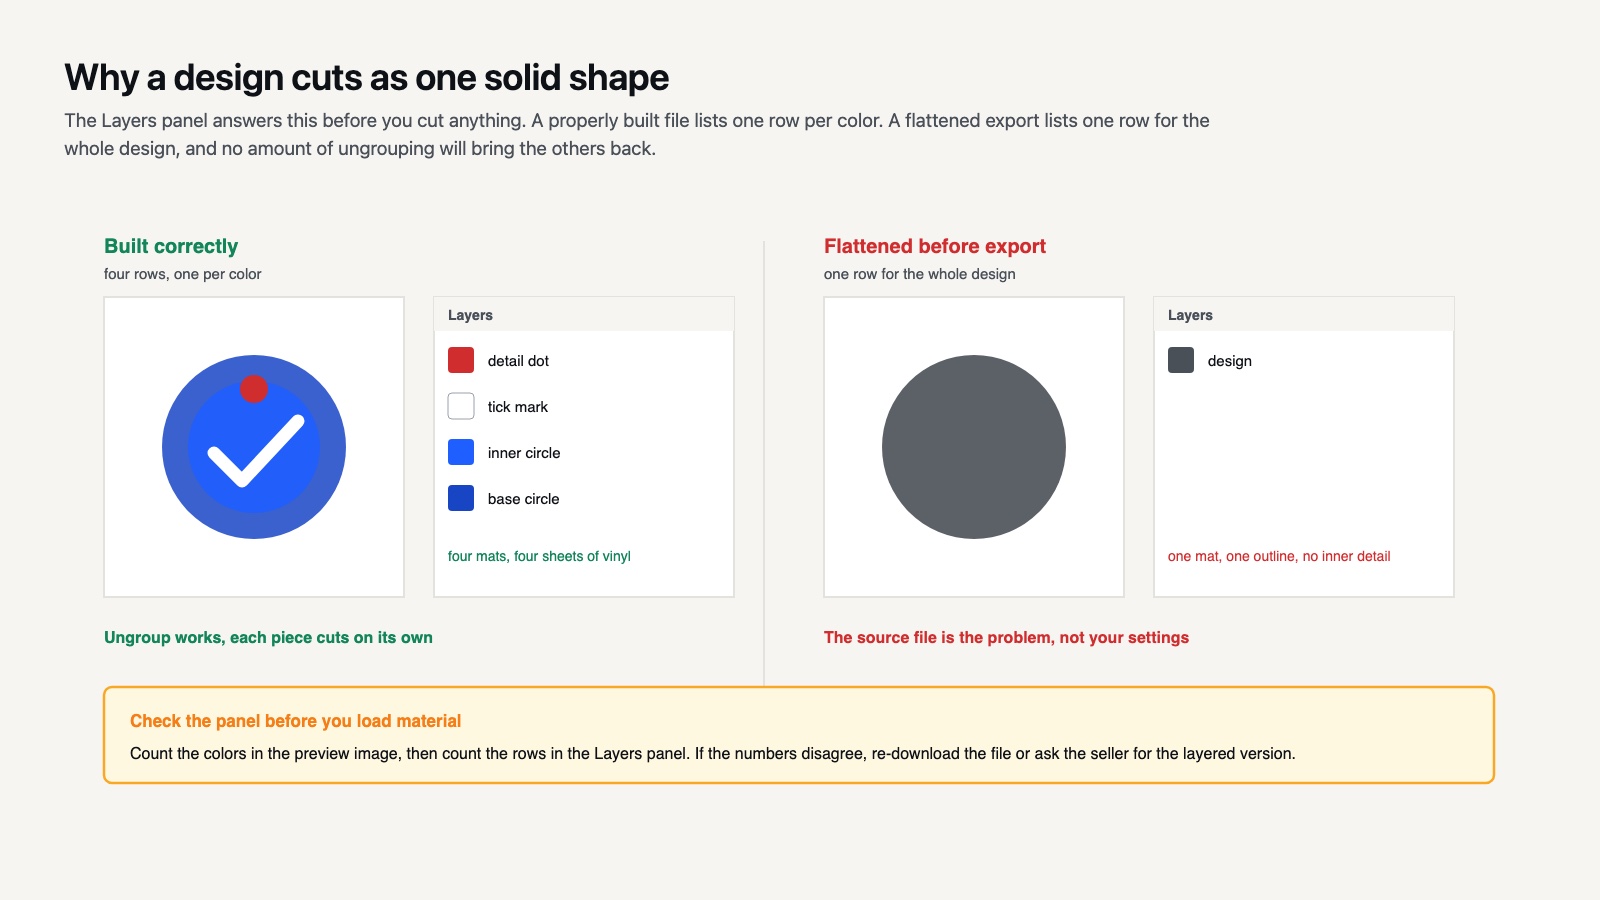
If your SVG cuts as a single outline with no inner detail, the layers were likely flattened, welded, or the design was a low-quality file with merged paths. Properly built cut files keep each color and cut line on its own layer. When you ungroup and still see only one layer, the source file is the issue, not your settings.
This is one reason file quality matters so much. A well-made SVG saves you from re-tracing or rebuilding the design. A file that refuses to separate is usually a flattened export rather than a broken download, and the layered SVG explainer shows what a correctly built one looks like in the Layers panel. The SVG DROP FAQ covers the rest of the common download problems.
About SVG DROP: Our team designs and tests every cut file on real Cricut machines before it goes live, uploading each SVG into Design Space to confirm clean layers and accurate cut lines. The steps above reflect the exact workflow we use daily when preparing files for crafters.
💡 Pro Tip
Upload the SVG once and save the project, not the upload. A saved project keeps your sizing, your color assignments and any Attach you set up, so the next time you cut the same design you open the project and press Make It. Re-inserting from Recent Uploads gives you the raw file again and you redo all of that work.
Quick tips for cleaner cuts
A smooth upload is only half the job. These habits keep your finished projects sharp.
- Keep a dedicated folder for unzipped SVGs so you never hunt through downloads.
- Name your uploads clearly inside Design Space for faster reuse later.
- Do a small test cut on scrap material before committing to expensive vinyl.
- Set the correct material in Design Space; the same SVG cuts differently on cardstock versus glitter vinyl. If it cuts but will not cut through, work down the blade, mat and pressure checklist.
- Match the mat to the material using Cricut’s mat grip guidance.
Once you have done it a few times, uploading an SVG becomes second nature, and you will spend more time crafting and less time wrestling with files. From there the next things worth learning are layering a multi-color design and curving text around a shape, which between them cover most of what people want from Design Space after their first few cuts.
Frequently asked questions
Is it free to upload SVG files to Cricut Design Space?
Yes. Uploading and cutting your own SVG files is completely free and does not require a Cricut Access subscription. You only pay for Access if you want Cricut’s own image and font library.
Can I upload SVG to Cricut Design Space on my phone?
Yes. The mobile app supports SVG uploads on both iOS and Android. Save the unzipped file to your device, open the app, tap Upload, then browse to the SVG and add it to your canvas.
Why are my SVG layers not separating?
Layers fail to separate when the file was flattened or welded before export. Try ungrouping on the canvas first. If only one layer appears, the original file lacks proper layering and may need a higher-quality version.