




How to Use Transfer Tape for Vinyl: Complete Guide
 Published
 Updated

Transfer tape lifts a weeded vinyl design off its backing paper in one piece and carries it to the surface you are decorating. How to use transfer tape, step by step: burnish the tape onto the vinyl, peel the backing away, position the design, burnish again, then peel the tape off at a sharp angle.
That is the whole job, and it goes wrong for exactly two reasons: the tape is stickier than the vinyl’s own adhesive, or it is not sticky enough. Everything else people struggle with, letters lifting, designs stretching, tape refusing to release, traces back to that balance.
Understanding which way that balance is tipping tells you what to change, and it is the real answer to how to use transfer tape reliably. A design that stays stuck to the tape needs less grip. Layered decals add another variable, since each layer has to register against the one below, and grouping and attaching layers correctly in your design software is what keeps that alignment through the transfer. A design that will not leave the backing paper needs more. Once you can read the failure, transfer stops being luck. If you are still at the stage of getting a clean cut in the first place, the vinyl cutting and application guide covers blade settings and weeding before any tape is involved.
What Transfer Tape Actually Is
Transfer tape, called application tape in the sign trade, is a carrier film with a light adhesive on one side and a release liner protecting it. It is engineered to hold vinyl firmly enough to lift it but weakly enough to let go once the vinyl touches a stronger surface.
The grades matter. Orafol’s ORATAPE MT80P, a common professional clear tape, uses a modified solvent polyacrylate adhesive described as medium strength, on a transparent PVC film. The datasheet notes it can be removed cleanly even after six months on the vinyl without the adhesive building up. That last property is why sign shops can cut work on Monday and apply it on Friday.
Craft tapes sold by machine brands sit in the same family with less documentation. The useful distinction is not brand but grip level, and manufacturers label it: standard or regular for smooth vinyl, and strong or high tack for textured stock.
📌 Did You Know?
Paper transfer tape and clear film transfer tape behave differently, and the paper version is what most sign shops use daily. Paper releases more predictably and costs less, but you cannot see through it to line a design up. Clear film exists mainly so you can position accurately, not because it performs better.
How Do You Use Transfer Tape Step by Step?
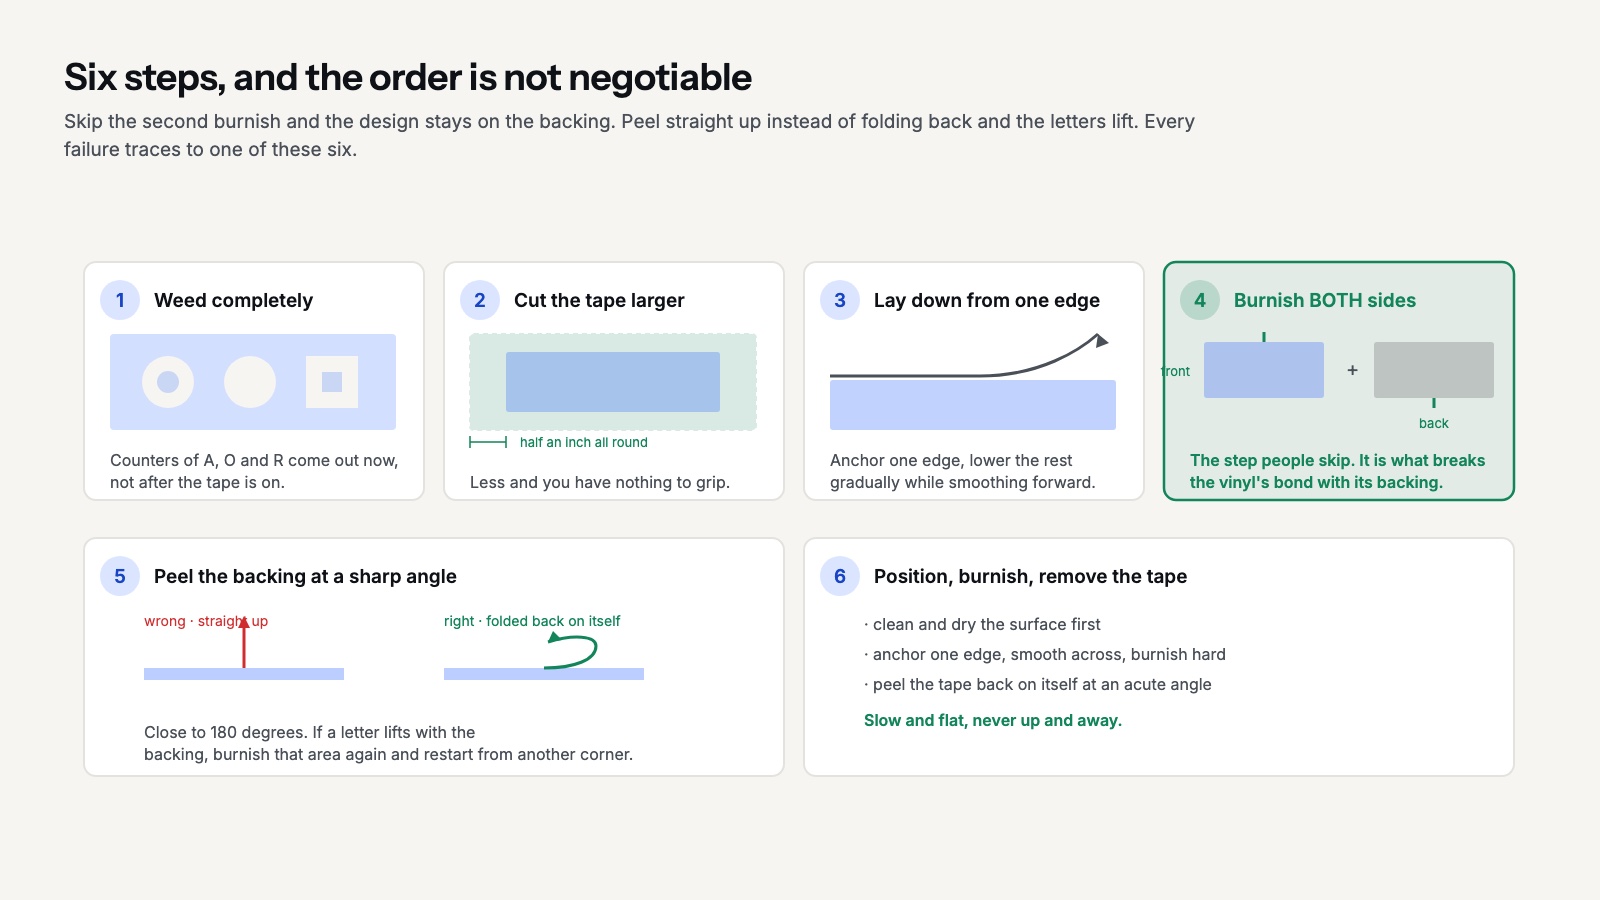
How to use transfer tape properly is six steps, and the order is not negotiable.
1. Weed first, completely
Remove every piece of vinyl that should not transfer, including the centers of letters like A, O and R. Weeding after the tape is on is possible and miserable. Hold the sheet up to a light at an angle; missed pieces show as a change in sheen.
2. Cut the tape slightly larger than the design
Roughly half an inch of margin all round. More than that wastes tape and makes the sheet unwieldy; less than that leaves you nothing to grip when peeling.
3. Peel the liner and lay the tape down from one edge
Do not drop the whole sheet flat. Peel the liner back, anchor one edge or the center of the tape to the design, then lower the rest gradually while smoothing forward. Cricut’s transfer tape instructions describe the same approach: attach a small area first, then burnish outward from it.
4. Burnish both sides
Work a scraper across the tape with firm pressure, then flip the whole sandwich over and burnish the back of the backing paper too. The second pass is the step people skip, and it is what breaks the vinyl’s bond with its backing.
5. Peel the backing at a sharp angle
Fold the backing paper back on itself at close to 180 degrees rather than lifting it straight up. If a letter starts coming with the backing, lay it down, burnish that area again, and restart from a different corner.
6. Position, burnish, remove the tape
Clean and dry the surface first. Anchor one edge, smooth across, burnish hard, then peel the tape back on itself at an acute angle. Slow and flat, never up and away.
💡 Pro Tip
Use the hinge method for anything you cannot afford to misplace. Tape the design in position with a strip of masking tape across the middle, flip one half up, peel that half of the backing, lay it down, then repeat on the other side. A mug wrap or a car decal placed this way lands straight the first time.
Choosing Grip: Standard or Strong?
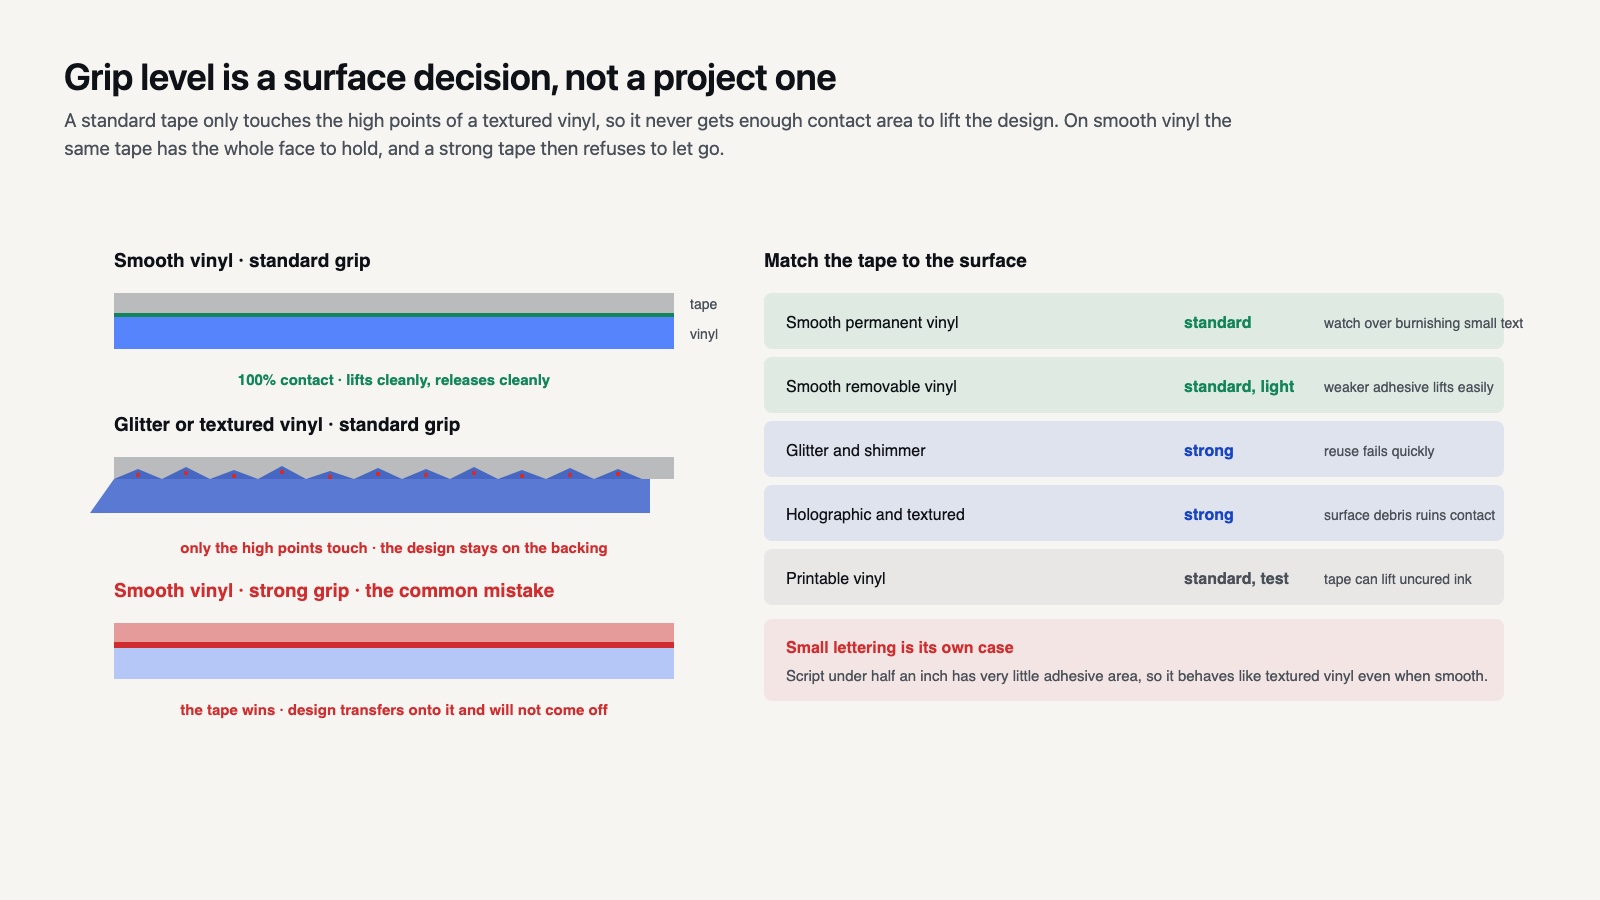
Match the tape to the vinyl surface, not to the project.
Standard grip is correct for ordinary smooth adhesive vinyl, which is the large majority of what crafters cut. Strong grip is for textured stock: glitter, shimmer, holographic and anything with a raised or granular surface, where a standard tape only touches the high points and cannot get enough contact area to lift the design.
Using strong tape on smooth vinyl is the more common error and it produces the most frustrating failure, a design that transfers onto the tape and then refuses to leave it. Cricut states this directly for its own product: StrongGrip transfer tape is too strong for use with other vinyl types and is intended for textured finishes. Glitter vinyl has its own application notes for the same reason.
Grip level by material
| Vinyl type | Tape grip | Watch for |
|---|---|---|
| Smooth permanent | Standard | Over burnishing small text |
| Smooth removable | Standard, light pressure | Weaker adhesive lifts easily |
| Glitter and shimmer | Strong | Tape reuse fails quickly |
| Holographic and textured | Strong | Surface debris ruins contact |
| Printable vinyl | Standard, test first | Tape can lift uncured ink |
Small lettering is a special case regardless of material. Thin script and text under about half an inch have very little adhesive area touching the surface, so they behave like textured vinyl even when they are smooth. Lettering sets sold as cut ready alphabets, including our SVG font collections, are usually drawn with thicker strokes for exactly this reason.
Can You Reuse Transfer Tape?
Yes, several times, which is why keeping a roll of each grip level is cheaper than it sounds. The pair covers everything a home cutting machine will throw at you.
Keep the release liner. After you peel the tape off a finished project, lay it back on its liner and it will serve for another three to five transfers on smooth vinyl before the adhesive picks up enough dust and fiber to stop gripping. Strong grip tape reuses less well because the textured vinyl it handles sheds particles into the adhesive.
You can tell it is finished when the tape no longer lifts the design on the first burnish. At that point it is not worth fighting; a failed transfer costs more in vinyl than a fresh piece of tape costs.
Masking tape and painter’s tape work as emergency substitutes for small, simple designs, and clear packing tape works for very small ones. Neither is a real replacement. Painter’s tape is opaque and low tack, packing tape is far too aggressive and will keep the vinyl permanently. They will get you through a single project at eleven at night, which is sometimes the whole requirement, and that improvised stage is something almost everyone passes through in their first weeks with a machine.
💡 Pro Tip
If a design refuses to leave the tape on a hard surface, warm it. A hairdryer on low for fifteen seconds softens the vinyl adhesive enough to grab the surface and lets the tape release. This is standard practice on glass and metal in cold rooms, where vinyl adhesive turns sluggish once the surface drops much below 60°F.

Reading a Failed Transfer
Every failure mode points at one variable, and naming it is faster than starting over.
Letters stay on the backing paper when the tape does not have enough grip or has not been burnished enough. Burnish both sides again, peel at a flatter angle, and if it persists move up a grip level.
Letters stay on the tape after application when the tape has too much grip for the vinyl, the surface is dirty, or the room is cold. Warm the design, burnish the surface harder, and peel slower at a sharper angle. Next time drop a grip level.
The design stretches or distorts when the tape is a film rather than paper and you have pulled it under tension. Film tapes have enough give to elongate a design by a few millimeters across a large decal, which is invisible until you line it up against a straight edge. Lay film tape down without pulling it.
Bubbles under the vinyl come from applying too fast, not from the tape. Work from one edge with a scraper held at about 45 degrees rather than laying the whole design down and flattening afterwards. Small bubbles in permanent vinyl usually disappear within a day as the adhesive settles; a bubble still there after 48 hours needs a pin prick and a thumb. The same technique applies to any label or decal work where edges have to sit flat.

Surfaces That Cause Trouble
Glass and glazed ceramic are the easiest, provided they are genuinely clean. Wash with soap, dry, then wipe with isopropyl alcohol and let it flash off. Any residue from a dishwasher rinse aid will defeat the adhesive.
Painted wood is the most common failure. Fresh paint keeps outgassing for weeks and vinyl will not bond to it, so give a painted surface at least two weeks before decorating. Matte and chalk paints are porous and hold vinyl poorly whatever you do; a coat of clear sealer first fixes that.
Powder coated tumblers and mugs behave well but are usually curved in two directions at once. Work from the center outward, and accept that a design over about three inches tall will wrinkle on a tapered cup no matter how carefully you apply it. Designs drawn for curved surfaces are shaped to compensate, which is why a tumbler wrap file is not simply a rectangle.
Fabric never takes adhesive vinyl. That is heat transfer vinyl territory and involves a press rather than tape, which trips up a surprising number of people in their first month. The HTV and infusible ink guide covers that side.
What This Means for Your Next Project
Transfer tape is the cheapest part of a vinyl project and the part that decides whether the expensive parts survive. Buying one roll of each grip level, keeping the liners, and spending thirty seconds on the second burnish will eliminate most of the failures people blame on their machine or their files. The tips section collects the rest of the small habits that separate a clean decal from a peeling one.
Frequently Asked Questions
Why won’t my vinyl stick to the transfer tape?
Either the tape is too weak for the vinyl’s surface texture, or you have not burnished the back of the backing paper. Try the second burnish first, since it costs nothing. If the vinyl is glitter or holographic, you need a strong grip tape rather than more pressure.
How long can vinyl stay on transfer tape?
Professional application tapes are rated for months on the vinyl without the adhesive bonding permanently, and Orafol’s MT80P datasheet cites clean removal after more than six months. Craft tapes are less generous. A few days is safe; a few weeks in a warm room is asking for trouble.
Do I need transfer tape for a single letter or shape?
No. A simple one piece decal can be peeled off the backing with your fingers or a weeding hook and placed directly. Tape earns its place the moment a design has multiple separate pieces whose relative positions have to be preserved.
Can I use transfer tape with heat transfer vinyl?
No, and you do not need to. HTV comes with its own clear carrier sheet already attached on the front, which does the same job. Applying transfer tape on top of that carrier adds nothing and can interfere with the heat press.