



Inkscape SVG Editor for Cut Files: A Practical Guide
 Published
 Updated
The Inkscape SVG editor is free and open source, runs on Windows, Mac and Linux, and it handles everything a cutting machine needs: opening SVG files, joining shapes, converting text to paths and tracing a bitmap into a cut line. For crafters it fills the gap between a design shop and paid software.
The reason the Inkscape SVG editor matters here is narrower than the reason designers use it. A cut file has to be a clean closed path with no stray nodes, no hidden duplicates and no text that depends on a font your machine cannot see. Design Space and Silhouette Studio can fix some of that and ignore the rest until the blade finds it. Inkscape lets you see the problem and repair it before the material is on the mat.
What follows is the subset of Inkscape a cut file user actually needs, in the order you will meet it. It assumes no design background. If you have not yet had a file behave strangely on the mat, the cutting machine basics guide is the better starting point, and you can come back when something breaks.
Why Cut File Users End Up in Inkscape
Three situations push people here, and none of them are about wanting to learn a design program.
The first is Silhouette Studio Basic, which will not open SVG at all. Inkscape opens the SVG and exports a DXF, which Basic does read. That single conversion saves the cost of the Designer Edition upgrade for anyone who only occasionally uses bought files.
The second is a file that cuts wrong: a word where the letters are separate instead of joined, a design with an invisible second copy of every path, or a shape whose outline cuts as two concentric lines instead of one. These are editing problems, not machine problems.
The third is turning an image into a cut file. A PNG, a JPEG or a photograph has no paths at all, and a cutter needs paths. Inkscape’s tracer is the free route to that conversion, with real limits covered further down.
📐 Technical Note
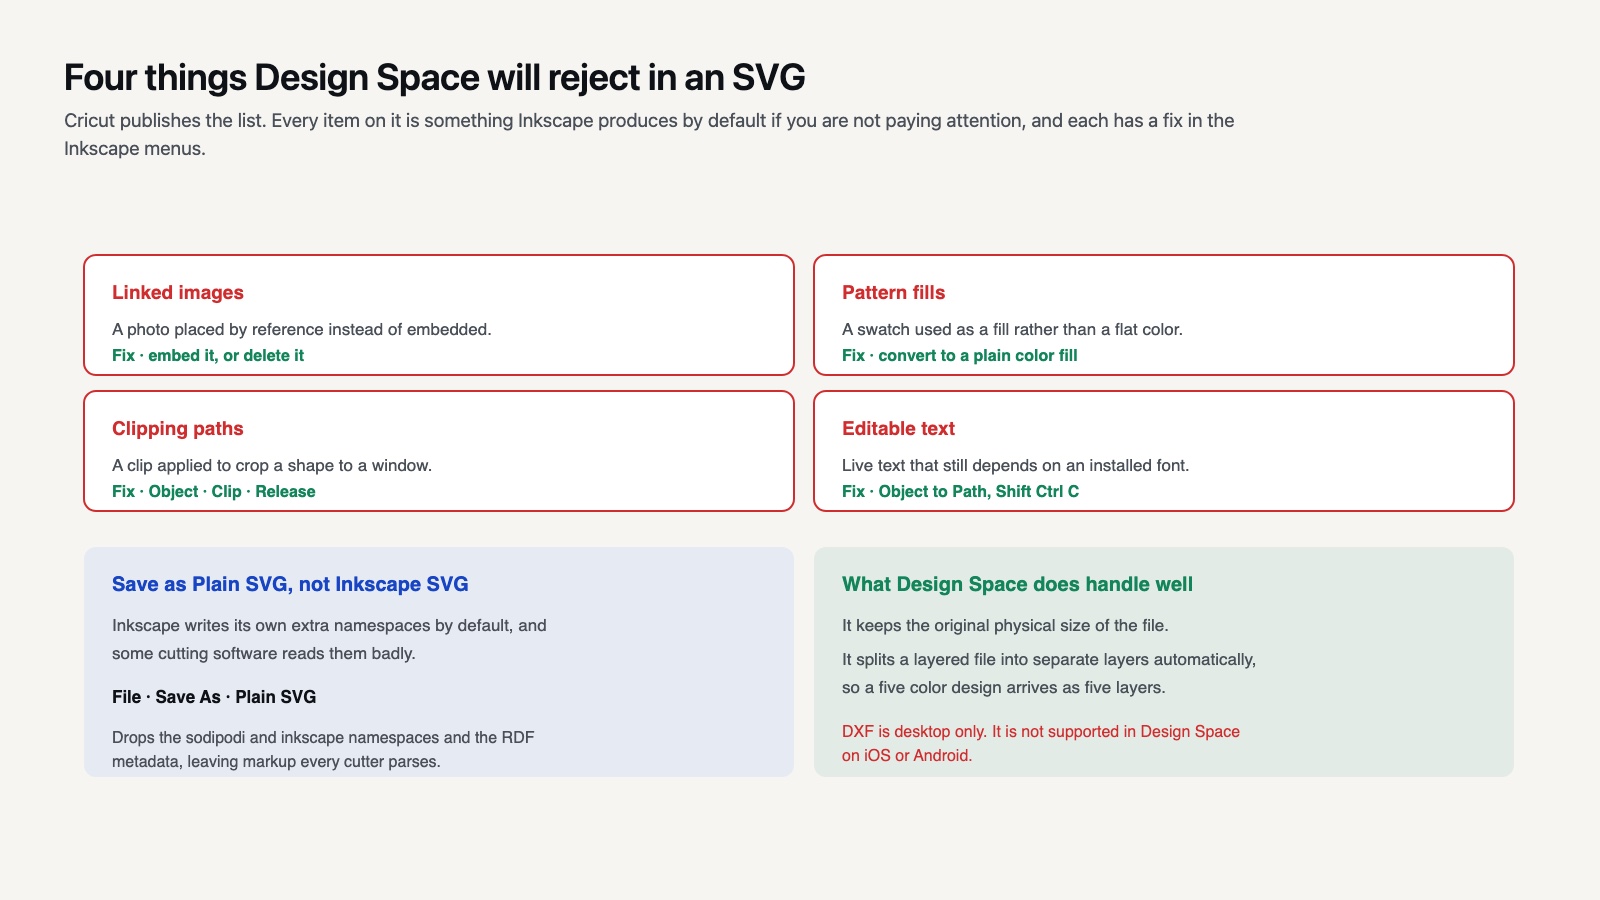
Inkscape writes SVG with its own extra namespaces by default, which some cutting software reads badly. Use File then Save As and pick Plain SVG rather than Inkscape SVG. Plain SVG drops the sodipodi and inkscape namespaces and the RDF metadata, leaving standard markup that every cutter parses.
What Design Space Will Reject
Knowing what the destination refuses saves the round trip. Cricut publishes the list, and four items on it are things Inkscape produces by default if you are not careful.
An SVG sent to Design Space must not contain linked images, pattern fills, clipping paths or editable text. Each has an Inkscape equivalent that is easy to leave in a file: an imported photo that was linked rather than embedded, a pattern swatch used as a fill, a clip applied to crop a shape, and any text you forgot to convert. Cricut’s unsupported items list is worth reading once in full.
The fixes are all in Inkscape’s menus. Object to Path handles text. Edit then Select All, then Object then Clip then Release, removes clipping. Pattern fills need converting to plain color fills, and linked images should be embedded or deleted. The upside is that Design Space otherwise handles SVG well: it keeps the original size and splits layered files into layers automatically, which is documented on the image upload page.
The Six Operations That Cover Most Cut File Work
The Inkscape SVG editor has hundreds of features. Six of them do almost everything a cut file needs, and they all live in the Path menu.
Union
Select overlapping shapes and use Path then Union to merge them into one outline. This is Inkscape’s equivalent of the weld operation you already know from machine software, and it is the fix for script lettering where the letters touch but cut as separate pieces. The internal edges disappear and you get a single continuous path.
Difference
Select two shapes and Difference removes the top one from the bottom one. Use it to punch a hole through a design, which is how you make a keychain ring hole or cut a window in a card front.
Object to Path
Text stays as text until you convert it, and text depends on the font being installed. Shift plus Control plus C turns selected text into paths. Always do this before saving a cut file for someone else, and before exporting to DXF, because a DXF carries no font information at all.
Simplify
Control plus L reduces the number of nodes in a path. Traced images arrive with hundreds of nodes per shape, and a cut path with too many nodes makes the blade stutter and the edges rough. Apply once, look at the shape, apply again if it still looks noisy. Two presses is usually the limit before the design visibly changes.
Break Apart and Combine
Break Apart splits a compound path into separate pieces; Combine puts them back. This is how you rescue a letter whose counter, the hole in an A or an O, has become a solid shape. Break apart, select the inner shape, then use Difference or Combine depending on what the design needs.
💡 Pro Tip
Turn on the XML editor with Control plus Shift plus X and leave it open. It shows you exactly how many objects are really in the file, which is the fastest way to find the duplicate paths that make a cutter trace every line twice. A file that looks like one shape and lists forty objects has a problem.

How Do You Convert a PNG to SVG in Inkscape?
Import the image, select it, then open Path and Trace Bitmap, or press Shift plus Alt plus B. Choose a mode, adjust the threshold until the preview matches what you want, apply, then delete the original image from underneath the new path.
Inkscape’s tracer is a front end to the Potrace engine, and the official tracing tutorial walks through the modes with examples. Brightness cutoff is the right choice for black and white line art. Color mode produces stacked paths per color and suits simple flat graphics. Neither mode will do anything useful with a photograph, and the tutorial says so directly.
After tracing, run Simplify. The tutorial recommends this explicitly because the tracer produces far more nodes than a hand drawn path needs, and reducing them makes the result both easier to edit and cleaner to cut.
⚠️ Common Mistake to Avoid
Expecting a traced photograph to cut. Tracing produces an outline of tonal regions, so a portrait becomes forty overlapping blobs that mean nothing as vinyl. Tracing works on logos, silhouettes and line art. For anything photographic, the correct route is Print Then Cut with a full color PNG rather than a cut file.
📌 Did You Know?
Trace Bitmap is not Inkscape’s own code. It is a graphical front end to Potrace, a separate open source tracing engine that Inkscape embeds. That is why the tracing options look different from the rest of the program, and why the same results can be reproduced from the command line.
Exporting for Your Machine
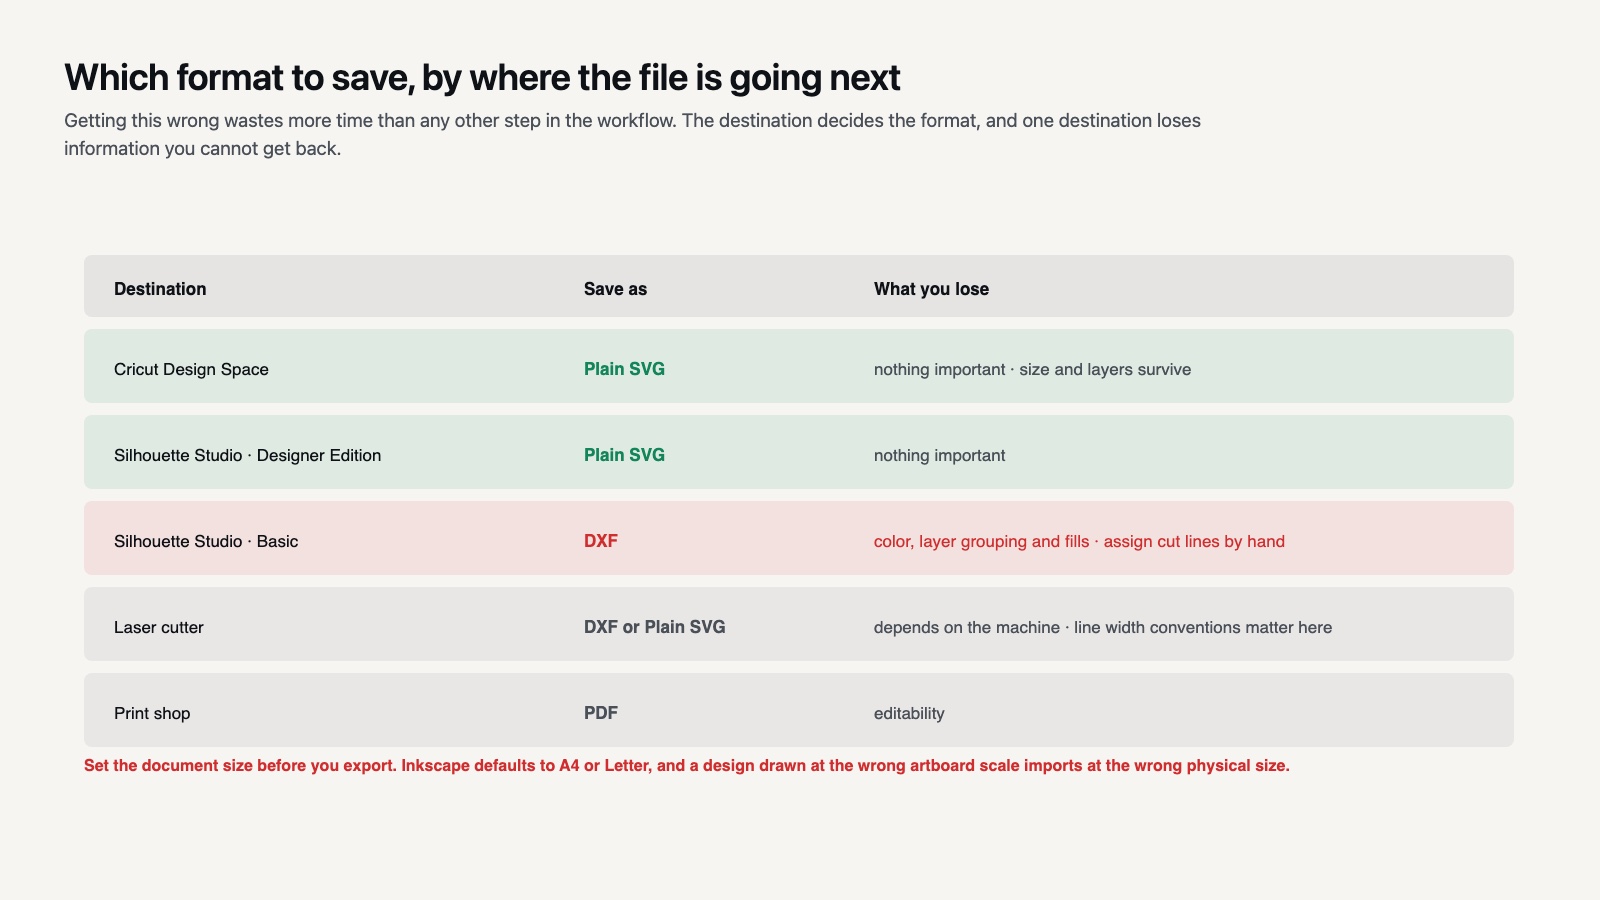
The export you want depends on which software will open the file next, and getting this wrong wastes more time than any other step.
For Cricut Design Space, save as Plain SVG. Design Space reads it directly and keeps your separate colored layers as separate layers, which is what you want for a layered design.
For Silhouette Studio Designer Edition, Plain SVG again. For Silhouette Studio Basic, save as DXF instead, accepting that color and layer grouping are lost and you will be assigning cut lines manually.
Note that DXF is not supported in Design Space on iOS and Android, only on desktop, which matters if you work mainly from a phone or tablet.
For a laser cutter, DXF or Plain SVG both work depending on the machine, and line width conventions matter in a way they do not for blade cutters. Check the machine documentation rather than assuming.
Format choice at a glance
| Destination | Save as | Loses |
|---|---|---|
| Cricut Design Space | Plain SVG | Nothing important |
| Silhouette Designer Edition | Plain SVG | Nothing important |
| Silhouette Studio Basic | DXF | Color, layers, fills |
| Laser cutter | DXF or Plain SVG | Depends on machine |
| Print shop | Editability |
Set the document size to match your material before exporting. Inkscape defaults to A4 or Letter, and a design drawn at the wrong document scale will import at the wrong physical size even though it looks right on screen. File, Document Properties, then set width and height in inches.
Checking a Bought File Before You Cut It
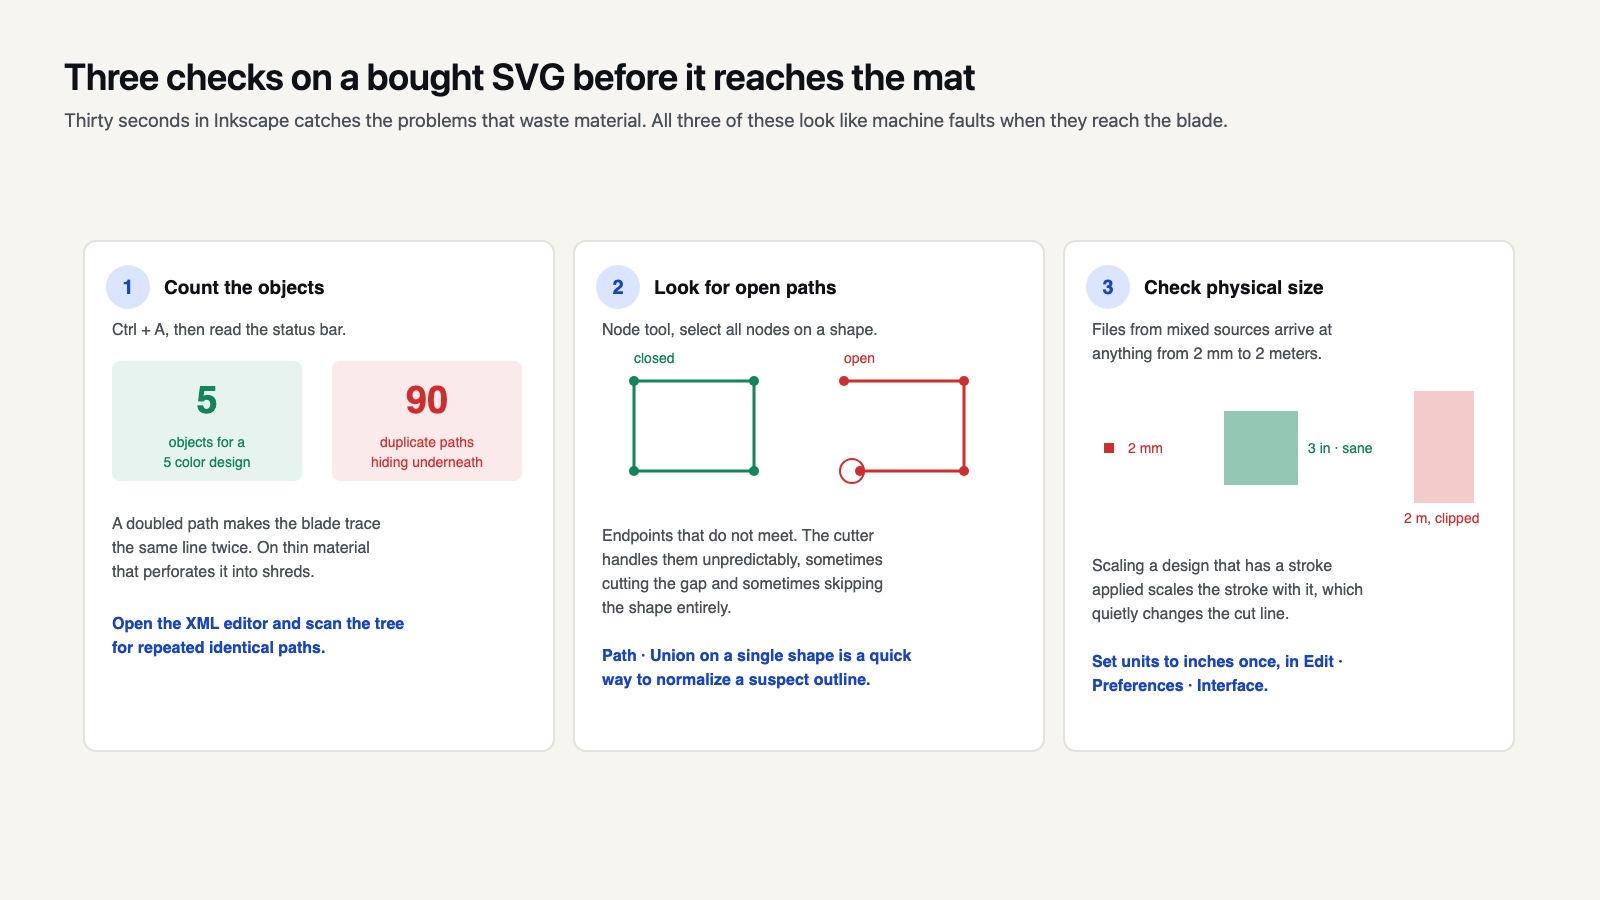
Opening a purchased SVG in Inkscape takes thirty seconds and catches the problems that waste material.
Open the file, select all with Control plus A, and look at the status bar. It tells you how many objects are selected. A five color layered design should report something close to five objects or five groups, not ninety. Then press Control plus Shift plus X and scan the XML tree for repeated identical paths.
Next, check for open paths. Select a shape, switch to the node tool, and select all its nodes. Open paths show endpoints that do not meet, and a cutter handles them unpredictably, sometimes cutting the gap and sometimes skipping the shape. Path then Union on a single closed shape is a quick way to normalize a suspect outline.
Finally, check physical size. Well built cut file and font sets are drawn to a sensible scale, but files from mixed sources arrive at anything from 2 mm to 2 meters, and scaling a design with a stroke applied will scale the stroke too.
💡 Pro Tip
Set Inkscape’s default units to inches once, in Edit then Preferences then Interface, and never think about it again. Craft materials, mats and machine settings in the United States are all in inches, and switching units mid project is where scaling errors get introduced.
Is Inkscape Enough, or Do You Need Illustrator?
For cut file work, the Inkscape SVG editor is enough. The operations that matter, union, difference, node editing, text to path and tracing, are present and behave the same way. Nothing about a vinyl decal requires a paid program.
Where Inkscape genuinely lags is speed on very large files, typography controls, and the polish of its interface. Designers producing hundreds of commercial files a month notice all three. Someone preparing a handful of designs a week will not.
The honest downside is the learning curve, and it is steeper than Design Space by a wide margin. Inkscape is a general vector editor that happens to suit cut files, not a craft tool. Expect a frustrating first hour. The project FAQ answers most of the early confusion, including the version and platform questions that trip up Mac users in particular.
Used alongside rather than instead of your machine software, it fits neatly. Design and repair in Inkscape, cut from Design Space or from Silhouette Studio, whose workflow the Cameo beginner guide covers. Neither program is good at the other’s job.
Looking Ahead
The interesting thing about a free editor being good enough is what it does to the rest of the workflow. Once file repair costs nothing but time, the question stops being which software you own and becomes which files are worth owning. A well drawn design opens clean in anything. A badly drawn one stays badly drawn however expensive the program you open it in.
Frequently Asked Questions
Is Inkscape really free for commercial work?
Yes. Inkscape is released under the GNU General Public License, and there is no separate commercial tier or restriction on what you make with it. The license covers the software, not your designs, which remain yours.
Can Inkscape open AI and EPS files?
It can open both, with caveats. AI files saved with PDF compatibility open reliably; older native AI files may not. EPS import requires Ghostscript to be installed separately on most systems, which catches a lot of people out on Windows.
Why does my Inkscape SVG import at the wrong size in Design Space?
Almost always a document units mismatch. Set Document Properties to inches and set the artboard to the physical size you intend before exporting. Resizing after import works but compounds rounding errors across layered designs.
Does Inkscape work on a Mac?
Yes, and the current versions run natively rather than through XQuartz as older releases did. Performance and keyboard shortcuts still feel less native than on Windows or Linux, which is a fair description rather than a complaint.