




HTV Heat Settings Guide: Temperature, Time, Layering
 Published
 Updated

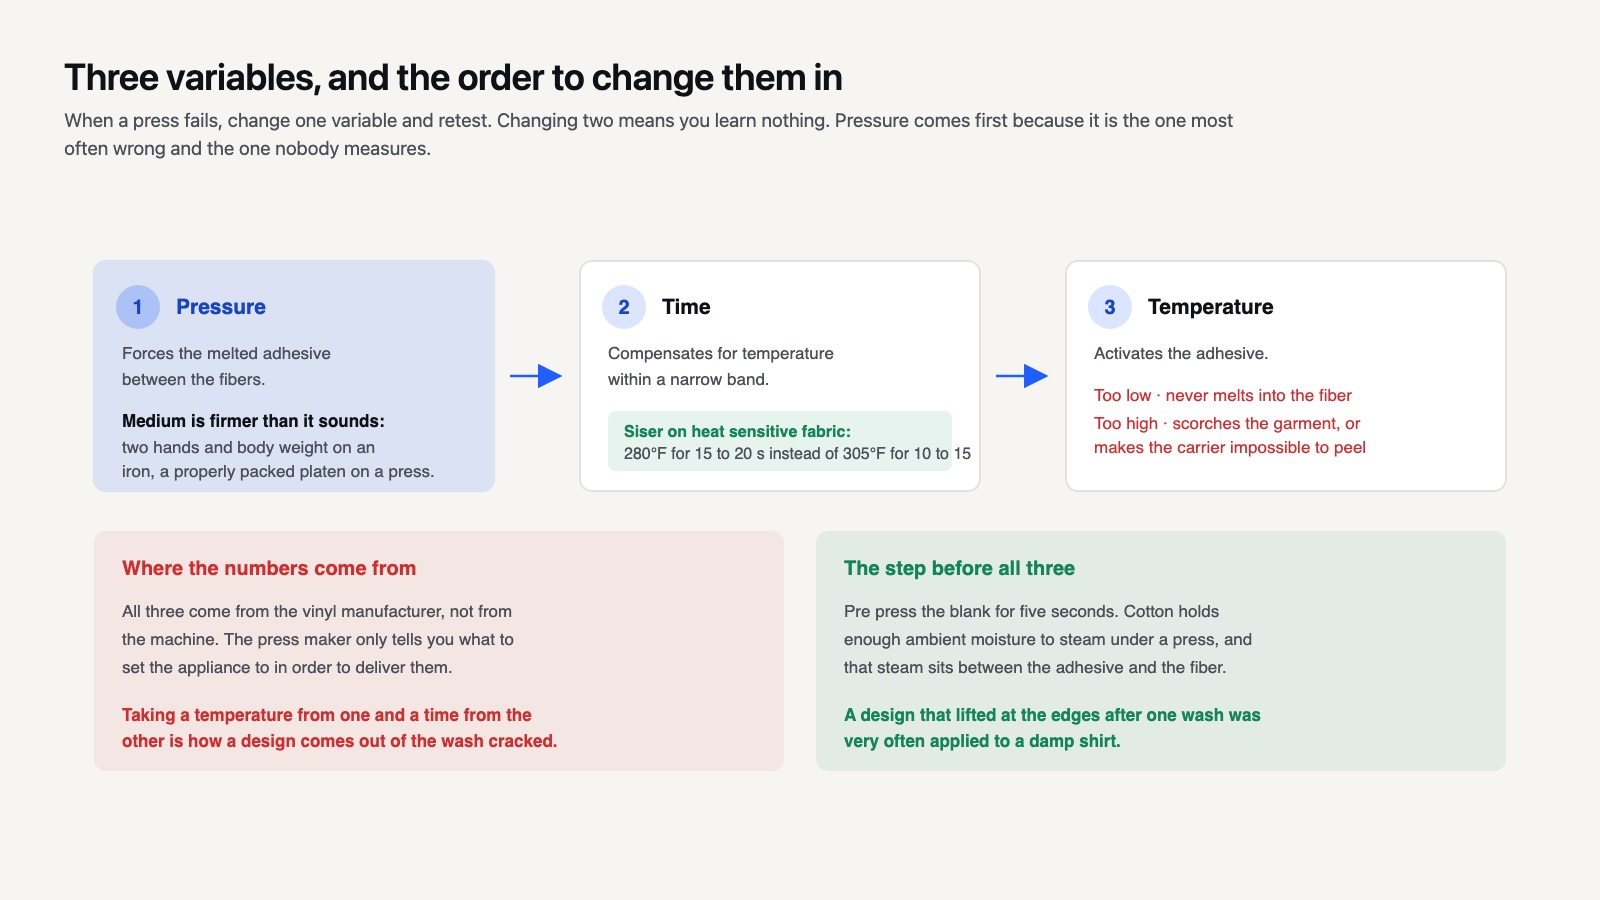
HTV heat settings have three variables: temperature, time and pressure, and all three come from the vinyl manufacturer rather than from the machine. Siser EasyWeed applies at 305°F with medium pressure for 10 to 15 seconds. Get one of the three wrong and the design either will not stick or will not survive a wash.
The reason HTV heat settings confuse people is that two different companies publish numbers for the same press. The vinyl maker states the temperature the adhesive needs; the press maker states what their appliance should be set to in order to deliver it. Those are not always the same number, and the gap is where most failed shirts come from.
What follows is the settings logic rather than a single chart, because a chart that covers every material and every press does not fit on a page and both manufacturers publish better ones than anyone could reproduce here. If you are still working out how to cut and weed HTV in the first place, the HTV and infusible ink guide covers that stage.
The Three Variables, and Which One to Change
HTV heat settings have a hierarchy. Temperature activates the adhesive. Too low and it never melts into the fiber; too high and you scorch the garment or make the carrier sheet impossible to peel. Time compensates for temperature within a narrow band. Pressure forces the melted adhesive between the fibers.
When something fails, change one variable and retest. Changing two means you learn nothing. The order to try them in is pressure, then time, then temperature, because pressure is the one most often wrong and the one nobody measures.
Medium pressure in manufacturer language is firmer than it sounds. With a household iron it means two hands and body weight over the plate; with a press it means the platen closed onto a properly packed surface. It is considerably more than most people apply. Siser’s guidance for heat sensitive fabrics shows the trade directly: drop to 280°F and the press time rises to 15 to 20 seconds, because lower heat has to be paid for in time.
🔢 Quick Numbers
- 305°F, medium pressure, 10 to 15 seconds for Siser EasyWeed, per Siser North America’s HTV application instructions
- 280°F for 15 to 20 seconds on heat sensitive fabrics, per the same Siser guidance
- Add 30°F to the stated temperature when using a Cricut EasyPress with Siser HTV, per Siser North America
- 1 to 3 seconds per layer when layering EasyWeed on a heat press at medium pressure, per Siser North America
Why Is Your Press Setting Not the Vinyl Temperature?
This is the single most useful thing to know, and it is published by the vinyl manufacturer rather than the press manufacturer.
Siser instructs users to add an extra 30°F to its standard settings when applying Siser HTV with a Cricut EasyPress. That is not a rounding adjustment. A platen reports the temperature of its heating element, and the heat that actually reaches the adhesive through a carrier sheet and a layer of fabric is lower. Different presses lose different amounts, so the manufacturer publishes a correction for the specific combination in their EasyPress guidance.
Cricut approaches the same problem from the other side with its Heat Guide, a free tool where you pick the transfer material, the base material and the press, and it returns the setting for that exact combination. For Cricut branded HTV on a Cricut press, use the Heat Guide. For a third party vinyl, use the vinyl maker’s chart and their correction for your press.
Mixing the two, taking a temperature from one and a time from the other, is how a shirt comes out of the wash with the design cracked. The numbers are a set.
⚠️ Common Mistake to Avoid
Skipping the pre press. Five seconds on the blank garment before the vinyl goes down removes moisture and flattens the weave. Cotton holds enough ambient moisture to steam under a press, and that steam sits between the adhesive and the fiber. A design that lifts at the edges after one wash was very often applied to a damp shirt.

How Do You Layer HTV Without Melting the Bottom Layer?
Layering works because the adhesive on the second layer bonds to the vinyl below it rather than to the fabric, but each pass also reheats everything underneath.
The rule is short presses for intermediate layers and a full press only at the end. Siser specifies 1 to 3 seconds per layer on a heat press at medium pressure, with the final layer getting the full time. Their layering guidance covers the sequence, and the logic holds across brands even where the numbers differ.
Weeding a layered design takes longer than a single color one, and the usual mistake is weeding all layers at once and losing track of which piece belongs where. Weed and press one color at a time. The same patience applies to adhesive vinyl work, where a misplaced layer is recoverable and on a garment it is not.
Three practical limits are worth knowing before you design. Not every HTV can be layered at all: glitter, flock and most specialty finishes are top layer only, because their surface will not accept another adhesive. Three layers is a sensible ceiling on a garment, since each layer adds stiffness and the result stops moving with the fabric. And layers should overlap by a millimeter or two rather than butting exactly, because vinyl shrinks very slightly under heat and a perfect butt joint opens into a visible line.
Designing for layering starts in the file. A layered design needs each color drawn as a complete shape with deliberate overlap, not as jigsaw pieces. Sets sold as layered SVG, including our layered cartoon designs, are built that way; a design flattened for print and separated afterwards usually is not.
Pressing Surfaces and Why the Ironing Board Fails
A padded ironing board absorbs pressure instead of returning it, which is why the same settings that work on a press fail on a board.
The surface under the garment needs to be firm and flat. A heat press mat, a pressing pillow or even a hardback book wrapped in a towel on a solid worktop will outperform a sprung ironing board every time. Cricut sells mats for this and the reason is not accessory upselling: the mat gives the platen something to push against.
Seams, zippers and collars create high spots that lift the platen off the design around them. A pressing pillow slipped inside the garment raises the print area above the seam line so the platen meets a flat plane. Designs placed near a chest seam or a pocket need this, and designs placed in the center of a plain front do not.
For curved items, a mug press or a hat press exists because a flat platen cannot make even contact with a curve. Wrapping a flat press around a tumbler with tape produces uneven adhesion that shows up after the first hand wash, which is why tumbler designs are usually sublimated or applied with a purpose made press rather than pressed with HTV on a flat platen.

Hot Peel or Cold Peel, and Why It Matters
The carrier sheet peel temperature is stated on the vinyl, and getting it wrong ruins the design rather than merely weakening it.
Siser EasyWeed is hot or cold peel, which is unusually forgiving and part of why it is the default recommendation for beginners. Many specialty films are cold peel only, meaning the carrier must reach room temperature before you touch it. Peel a cold peel film hot and the vinyl stretches and lifts with the carrier.
Reading the peel type is part of reading the whole product sheet, and it is worth doing once per new film rather than once per project. The habit pays off most on specialty finishes, where three products from the same brand can have three different peel instructions. Anyone pressing regularly should keep the sheets filed with their shirt design files so the settings travel with the project.
If a corner lifts as you start peeling, stop, lay the carrier back down and press for another 5 to 10 seconds. Siser gives this as the standard recovery, and it works far more often than re pressing the whole garment from scratch.
💡 Pro Tip
Buy an infrared thermometer before you buy a second heat press. Household irons and budget presses can sit well away from the temperature on their dial, and checking takes three seconds. Most settings problems that look like vinyl problems are a press telling you a number it is not delivering.

Does Fabric Change the Settings?
Yes. Fabric changes HTV heat settings more than anything else, and it is the variable people adjust last when it should often be first.
Cotton is the easy case and every standard setting assumes it. Before any of this matters the design has to cut and weed cleanly, which is covered in the machine basics guide. Polyester needs lower heat because it scorches and because dye migration turns white vinyl pink on colored polyester. Poly cotton blends sit in between and usually take the polyester setting. Nylon needs a low temperature film made for it, since standard HTV will not bond to nylon at any setting you can safely apply.
Performance fabrics, the stretchy shiny ones used for sportswear, are the hardest. They are almost always polyester, often treated with a water repellent finish that actively resists adhesive, and they stretch, which cracks a stiff film. Stretch rated HTV exists for exactly this.
The sensible workflow is to decide the garment first, then pick a film rated for it, then take that film’s chart. Choosing a vinyl because you like the color and then hunting for a garment it will stick to is the wrong order, and it is how people end up with a drawer of shirts that shed their designs.
Fabric and film pairing
| Fabric | Heat approach | Main risk |
|---|---|---|
| 100% cotton | Standard chart setting | Under pressing |
| Polyester | Lower heat, longer time | Scorch marks, dye migration |
| Poly cotton blend | Treat as polyester | Dye migration on darks |
| Nylon | Low temperature film only | Melting, no bond |
| Performance stretch | Stretch rated film | Cracking at the seams |
None of this is guesswork on the manufacturer’s side. Siser publishes a material reference chart covering its whole range in one document, and keeping a printed copy next to the press is more reliable than remembering.
Where to Go From Here
Your Next Step: Press one test square of your usual vinyl on an offcut of your usual garment at the manufacturer’s setting, wash it three times, and keep it. That square becomes your reference for every settings argument afterwards, and it costs one scrap of material. Everything else in the machine and materials guides builds on knowing your own press honestly.
Frequently Asked Questions
Can I use a household iron instead of a heat press?
For small designs on cotton, yes, with two caveats. An iron has no consistent temperature across its plate and no way to apply even pressure, so work in sections and lean hard. Turn the steam off completely and empty the reservoir, because steam holes leave unpressed circles in the design.
Why does my HTV peel off after washing?
Under pressing is the usual cause, followed by a damp garment and then by washing too soon. Give a fresh press 24 hours before the first wash, turn the garment inside out, wash cool and skip the dryer. If the design lifts at the edges only, that is pressure; if it lifts as a whole sheet, that is temperature.
How many times can I re press a design?
Two or three short re presses are fine and are the correct fix for lifting edges. Beyond that the vinyl starts to lose its finish, glitter dulls and matte films go shiny. Cover the design with a Teflon sheet or parchment for any re press, never press bare vinyl directly.
Do I need to mirror HTV designs?
Always. Heat transfer vinyl is cut face down on its carrier, so the design must be mirrored in your software before cutting or it will apply reversed. This catches everyone at least once, and it is the reason experienced crafters check the mirror toggle twice.